
🔐 Account Activation Process
+
2. Login Credentials
Enter your assigned credentials:
• Employee ID
• Temporary Password (your ID number)
• Temporary Password (your ID number)
3. Mandatory Password Update
After your first login, the system will automatically redirect you to the password update
screen to secure your account.
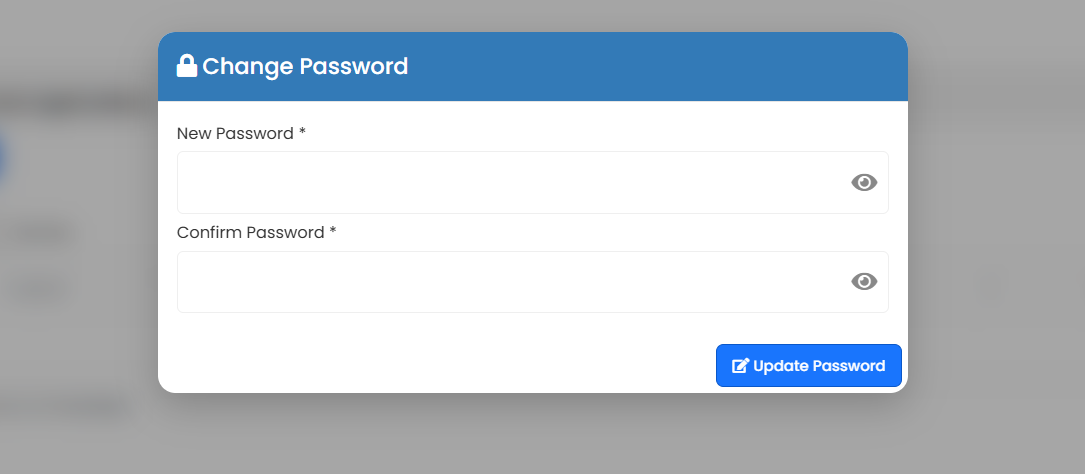
4. Account Activation Complete
Once your password has been successfully updated, your account will be fully
activated.
You will be automatically redirected to the My Applications page where you can now start creating and managing tickets.
You will be automatically redirected to the My Applications page where you can now start creating and managing tickets.
✓ Account Active — Ready for Ticket Submission
🔑 Forgot Password Process
+
2. Click Forgot Password
On the login page, click the
Forgot Password button to begin account recovery.
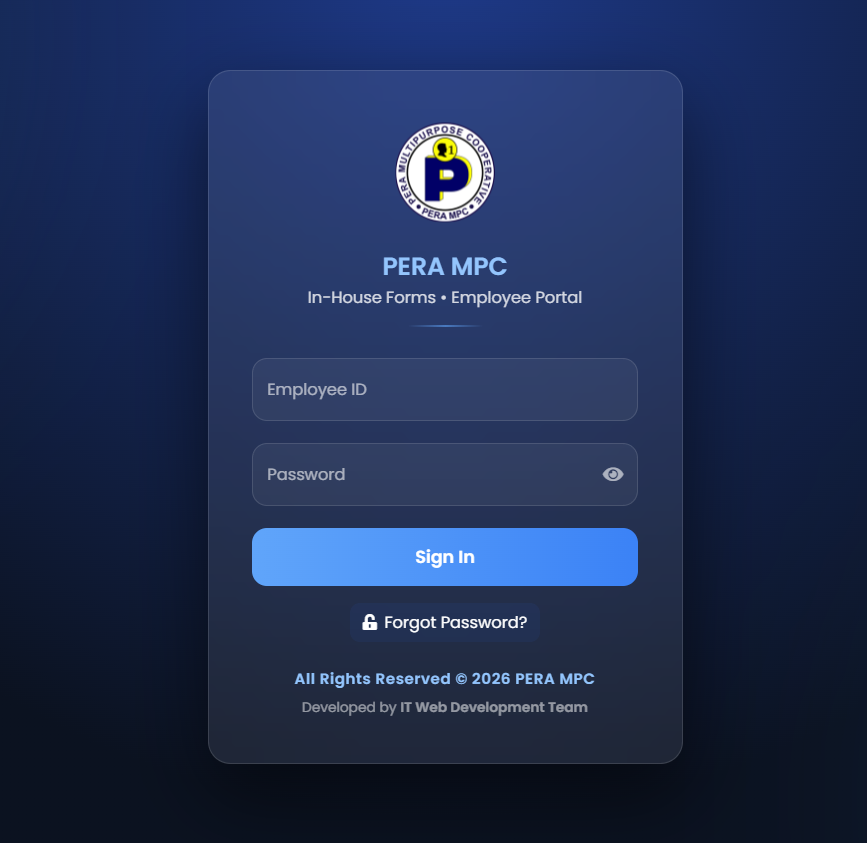
🔐 Secure OTP Verification Required
3. Enter Employee ID
Provide your registered Employee ID then click
Send OTP.
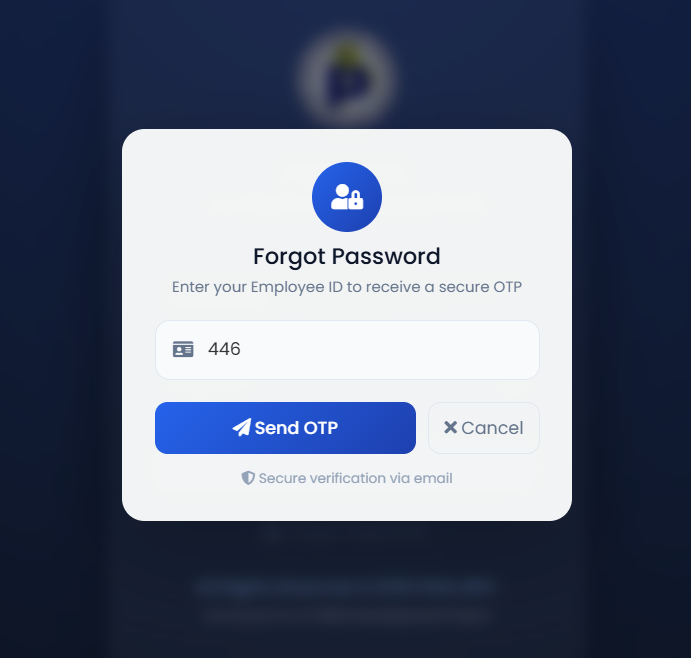
• OTP validity: 10 minutes
• OTP will be sent to your registered email
• OTP will be sent to your registered email
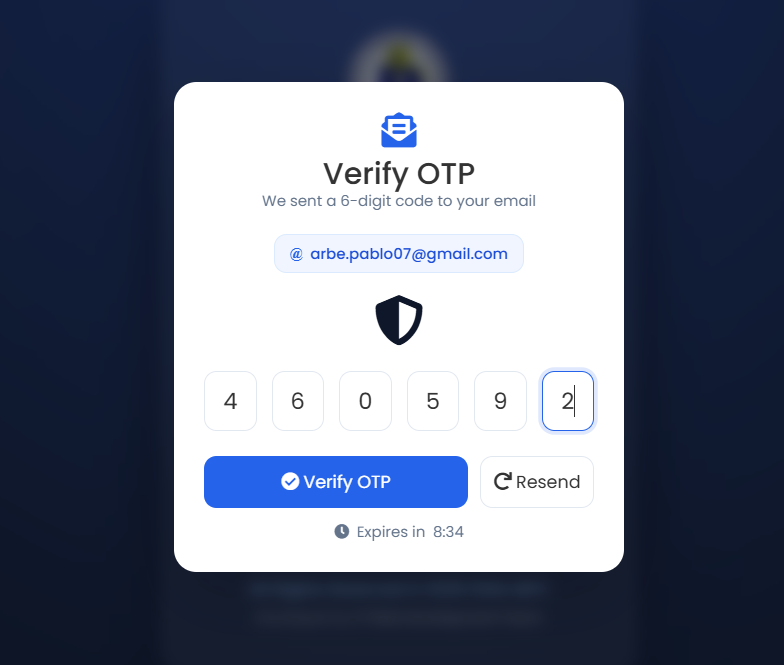
4. Verify OTP Code
Enter the 6-digit verification code sent to your email address.
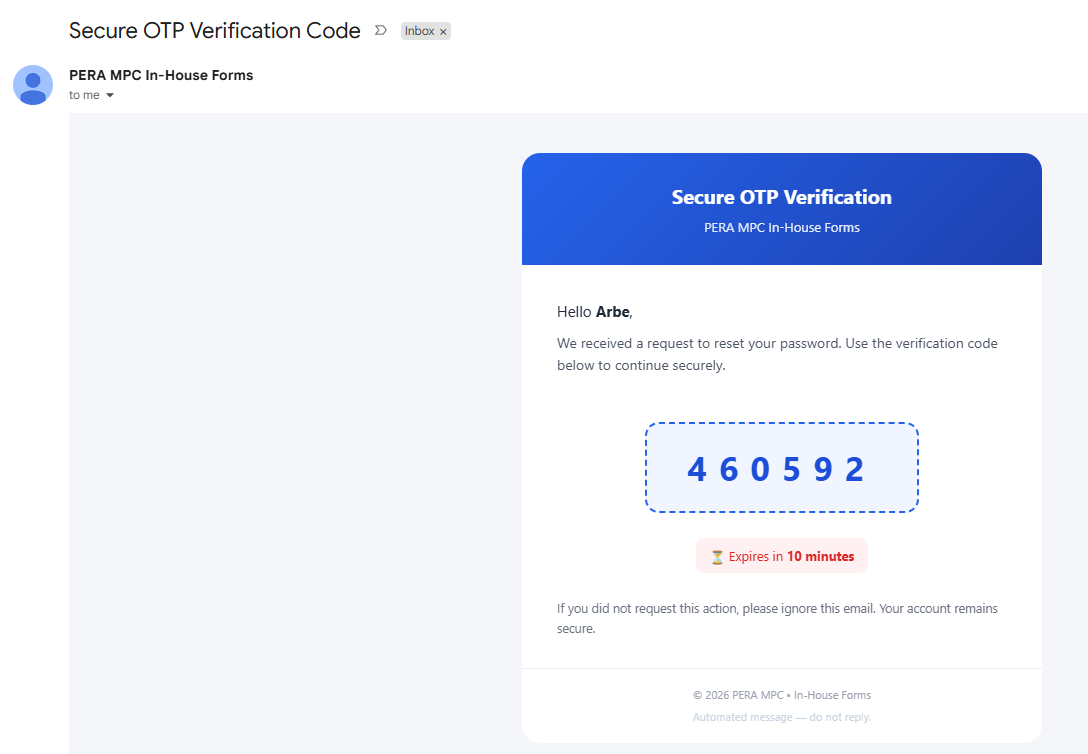
5. Copy Temporary Password
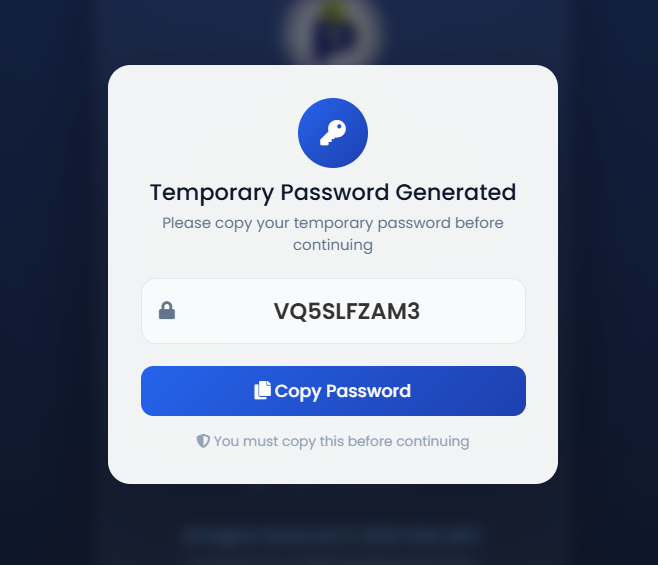
After successful OTP verification, the system will generate a
temporary password for your account.
📋 Copy the temporary password before continuing
6. Login & Update Password
Use the generated temporary password to log in, then immediately
update your password to secure your account.
✓ Password Recovery Completed Successfully
💸 Fund Transfer Request Form
+
REQUESTER GUIDE
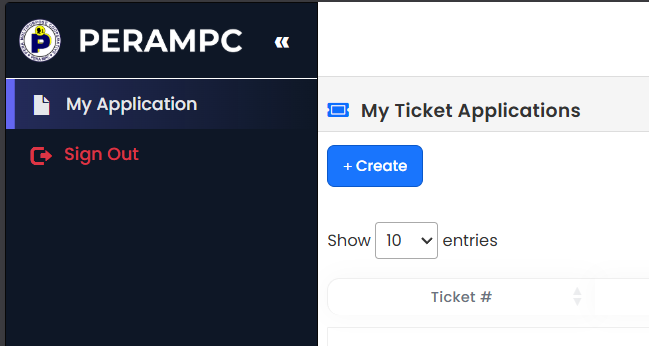
1. Access My Application Page
Go to the My Application page and click the “Create” button to start a new
request.
2. Select Form Type
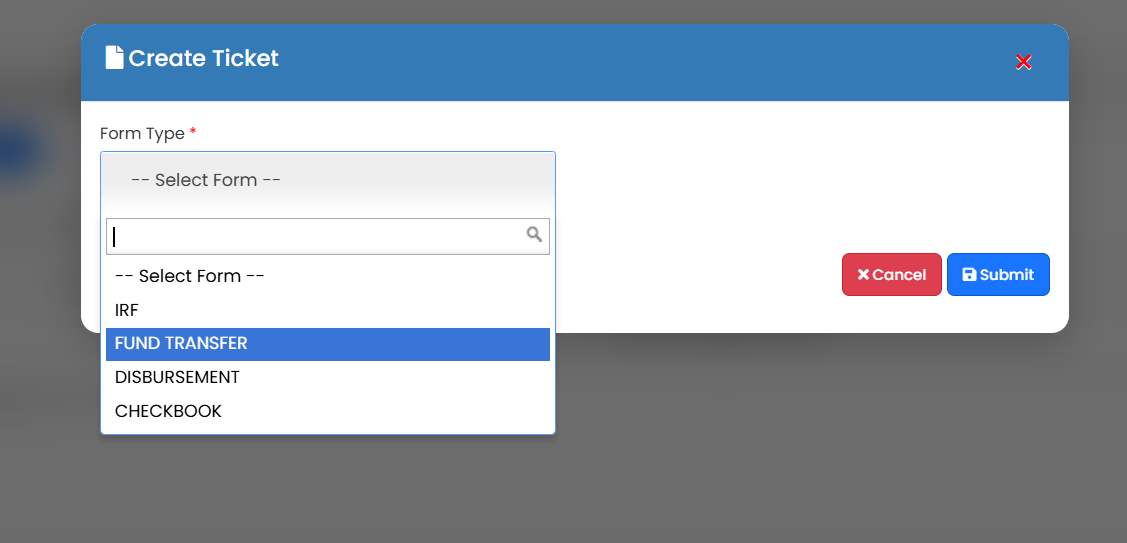
When the Create Ticket Modal appears, click the Form Type dropdown and select
“FUND TRANSFER”.
3. Complete Required Information
Fill out all required fields accurately and ensure all details are correct before
proceeding.
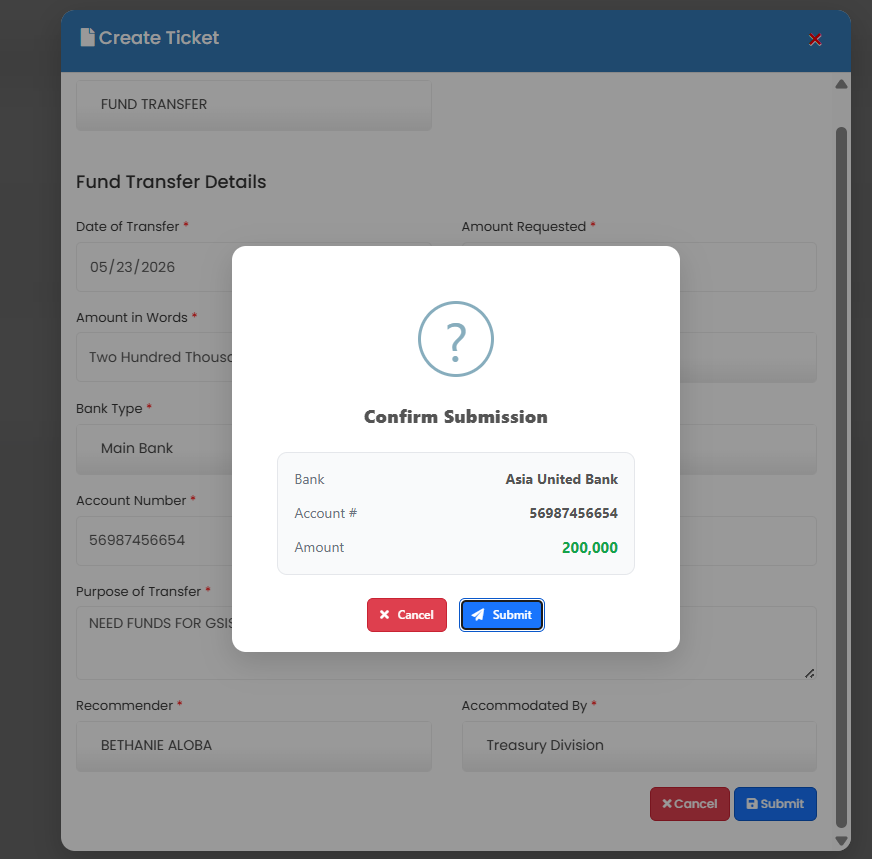
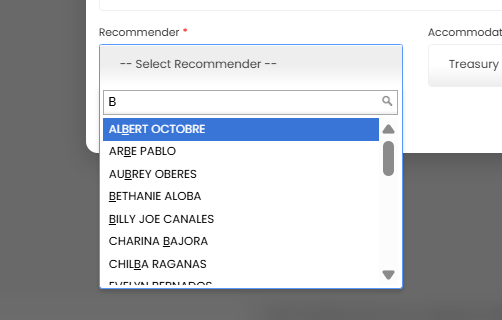
4. Select Recommender
Click “Select Recommender” and choose the appropriate ICO / Branch Manager of your
office as the official recommender.
5. Submit Request
Click “Submit” once all details have been verified and completed. Your request will
then be forwarded for approval.
✓ Fund Transfer Request Submitted — Pending Recommender Review
ROLE TRANSITION
RECOMMENDER GUIDE
1. Access For Approvals Page
Go to the For Approvals page and click the “View” to take action of the
pending
request.

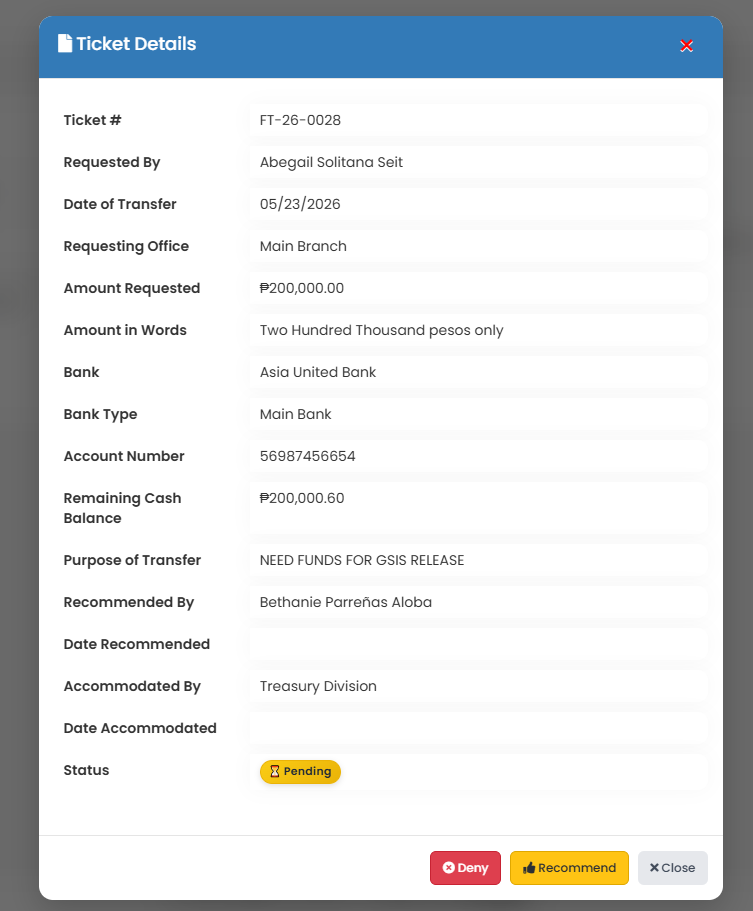
2. Open Ticket Details & Select Action
Once the Ticket Details Modal appears, review all request information
carefully.
Then choose your action based on evaluation:
Then choose your action based on evaluation:
• Click “Recommend” if the request is valid and approved for
next level processing.
• Click “Deny” if the request is invalid, incomplete, or not approved.
• Click “Deny” if the request is invalid, incomplete, or not approved.
✓ Recommend → Approve for Next Level
✕ Deny → Reject Request
3. System Status Update After Action
After selecting an action in Step 2, the system will automatically update the request status
based on your decision.
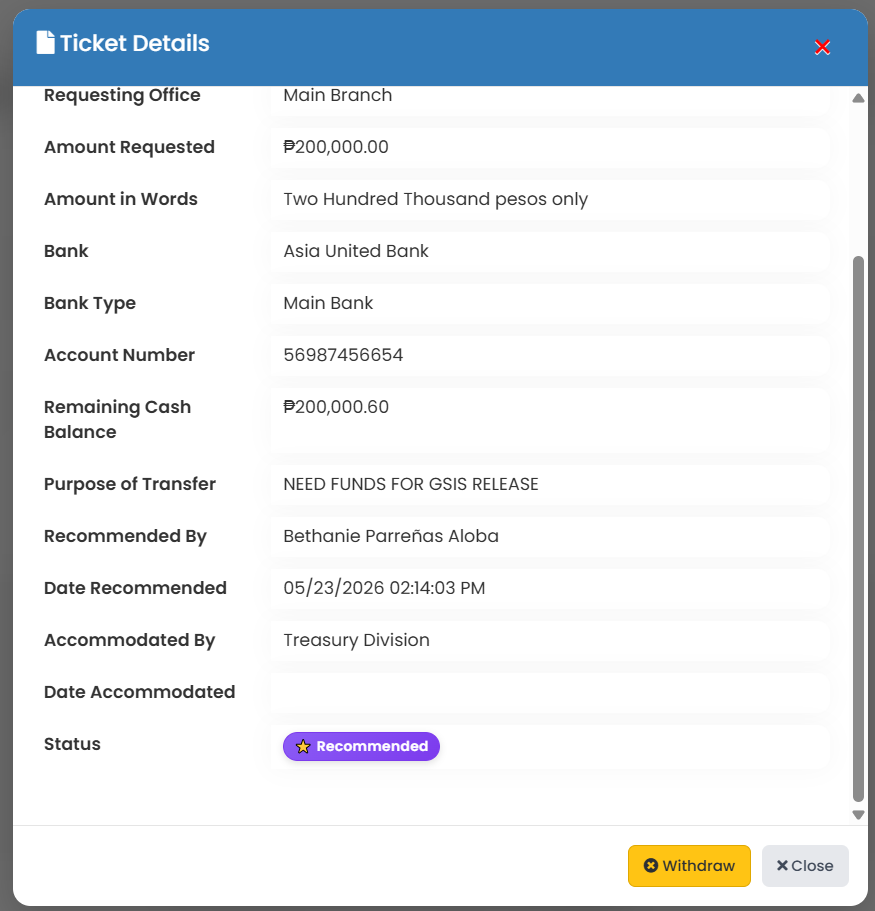
If you click “Recommend”:
⭐ Status: Recommended — Pending Approver Action
The request will be forwarded to the Head Office In-Charge / Officer for final
verification and approval processing.
📝 The Requester may still submit a withdrawal request while the status is
Recommended, provided that the request has not yet been approved by the Approver.
If you click “Deny”:
✕ Status: Denied — Request Closed
If the requester submits a withdrawal request and the Recommender approves the
withdrawal,
the request status will automatically become:
🚫 Status: Cancelled — Withdrawal Approved
4. Final Approval & Resolution Process
Once the Fund Transfer Request has been reviewed by the
Head Office In-Charge / Officer, the approver may proceed with
final approval and resolution of the request.
If the request is approved and resolved:
✅ Status: Resolved — Funds Successfully Credited
Once the request reaches the Resolved status,
the Office Email Address associated with the request will automatically
receive an email notification confirming that the Fund Transfer Request
has been completed successfully.
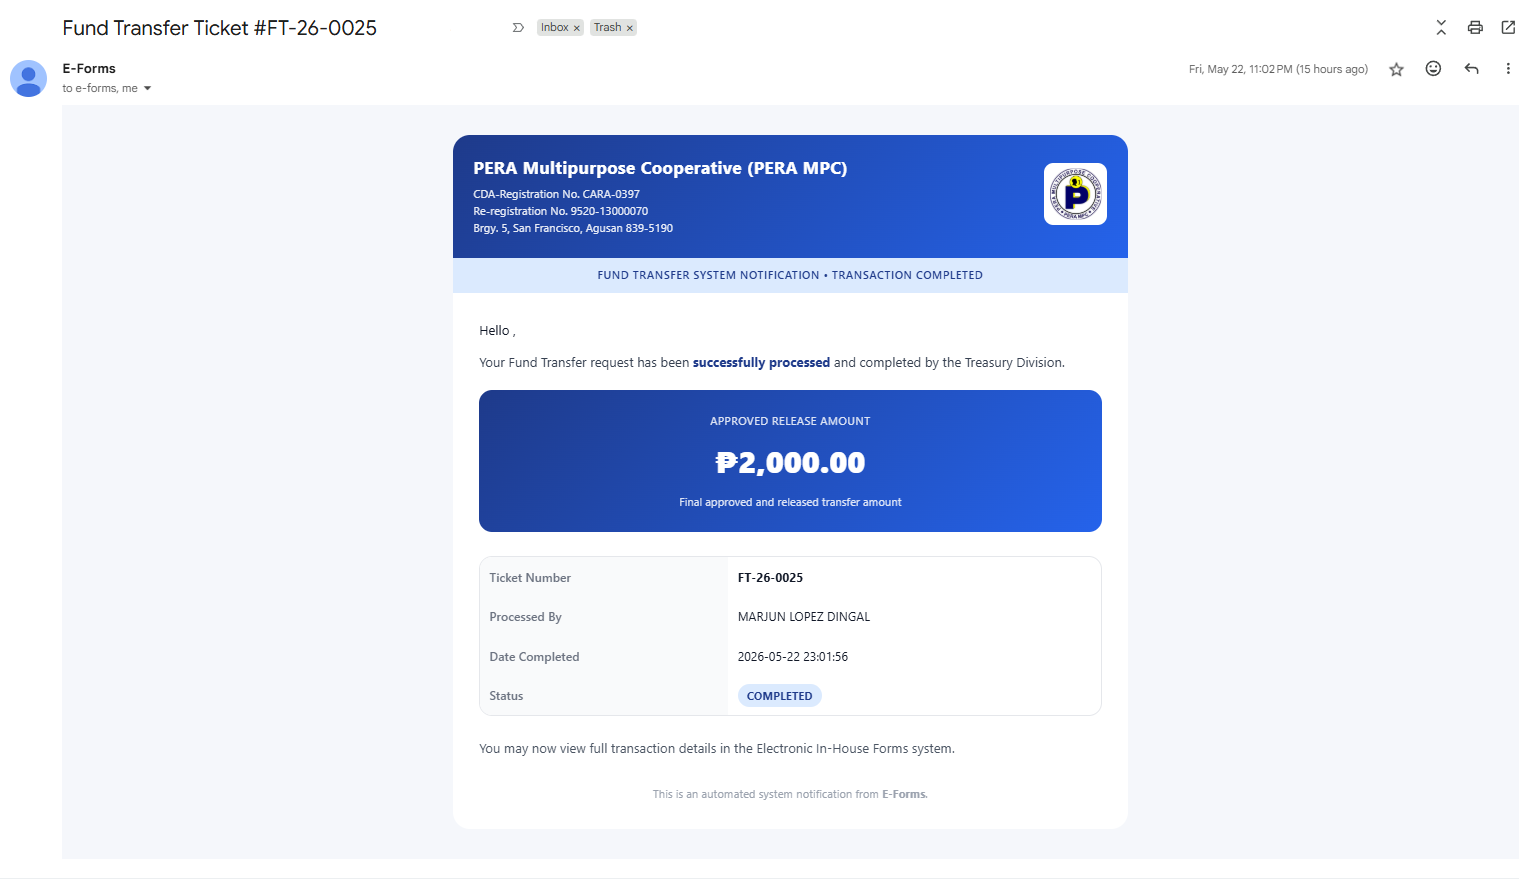
📧 Email notifications are automatically sent once the FT Request has been
fully approved and resolved by the Head Office In-Charge / Officer.
💰 Disbursement Request Form
+
REQUESTER GUIDE
1. Access My Application Page
Go to the My Application page and click the “Create” button to start a new
request.
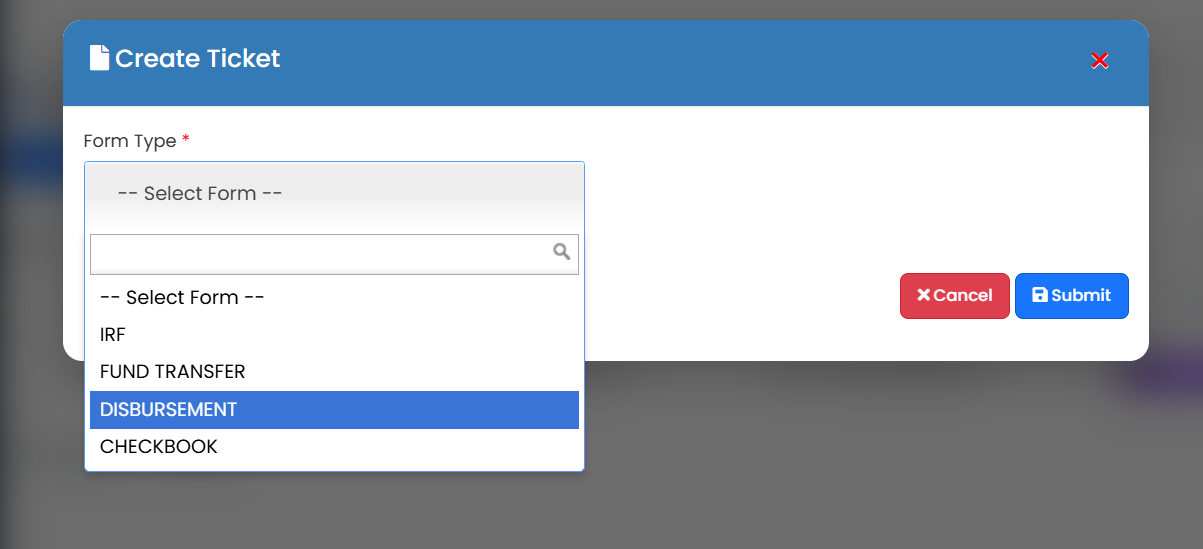
2. Select Form Type
When the Create Ticket Modal appears, click the Form Type dropdown and select
“DISBURSEMENT”.
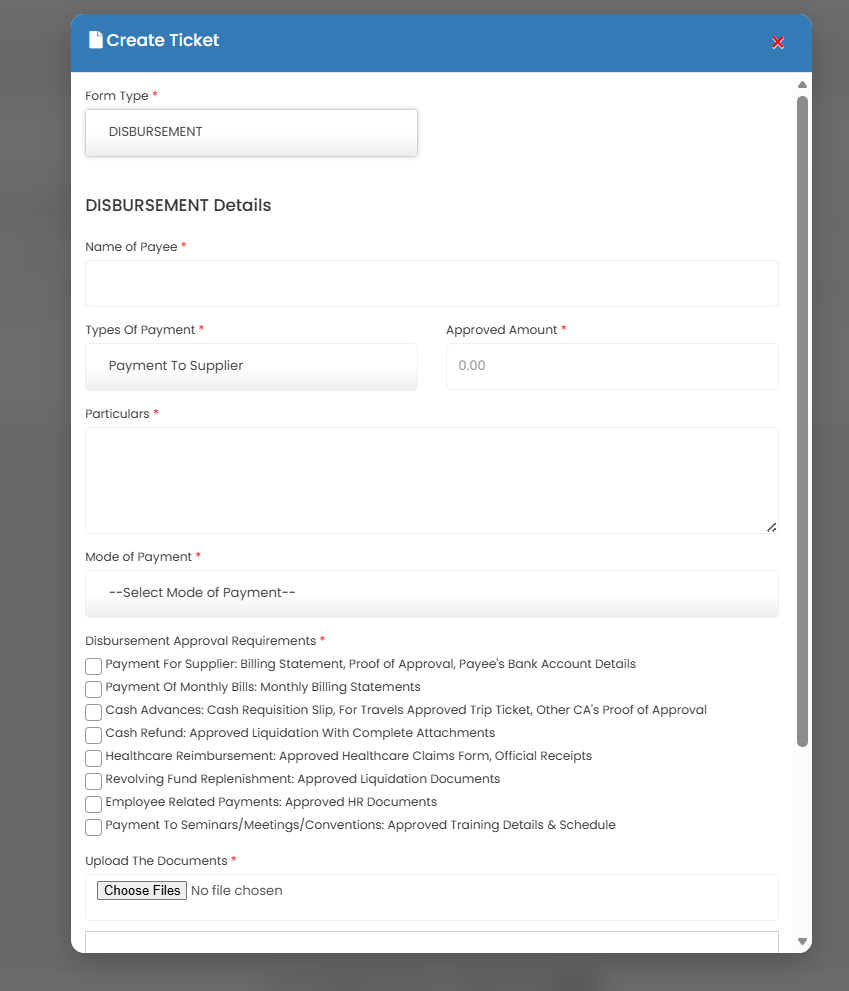
3. Complete Required Information
Fill out all required fields accurately and ensure all details are correct before
proceeding.
4. Submit Request
Click “Submit” once all details have been verified and completed. Your request will
then be forwarded for Treasury Department review.
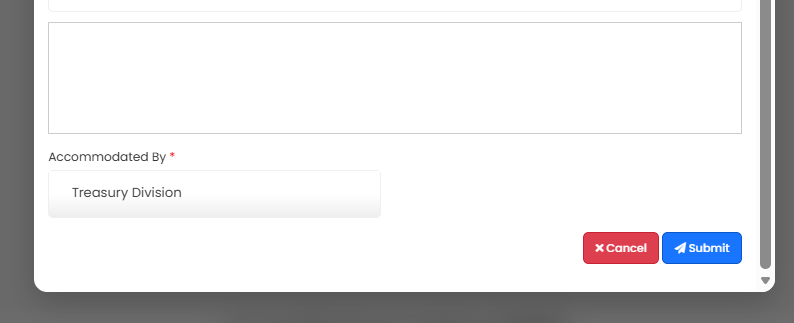
✓ Disbursement Request Submitted — Pending for Review
TRESURY DEPARTMENT
5. System Status Update After Treasury Department Action
Once the Treasury Department has approved the request, the requester only needs to wait for
the disbursement process to be completed.
📝 The Requester may still submit a withdrawal request while the status is
Pending, provided that the request has not yet been approved by the Treasury
Department.
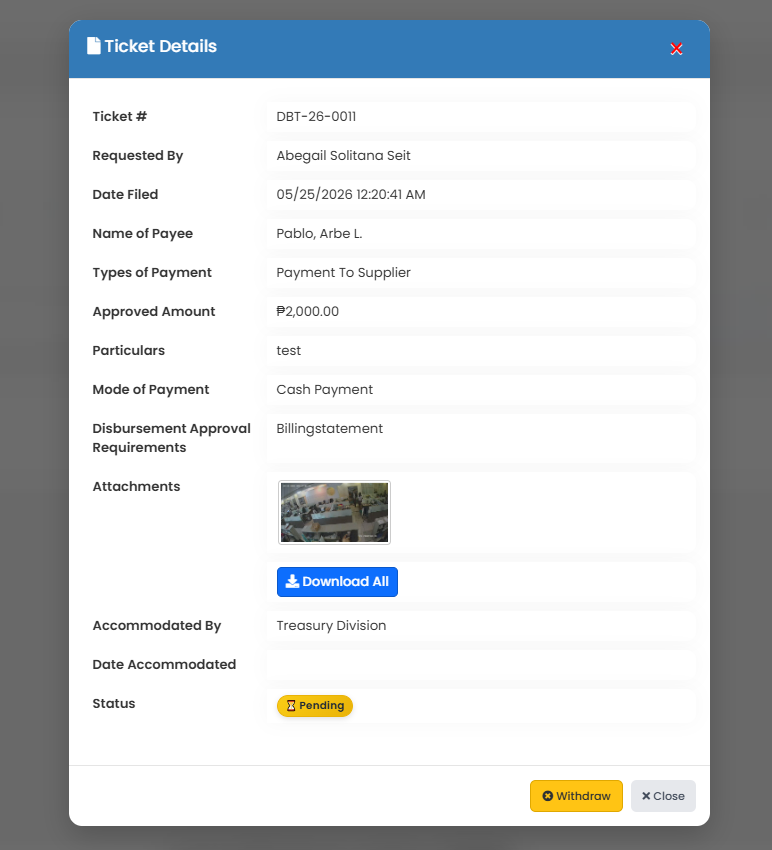
If the requester submits a withdrawal request,
the request status will automatically become:
🚫 Status: Cancelled
6. Final Approval & Resolution Process
Once the Disbursement Request has been reviewed by the
Head Office In-Charge / Officer, the approver may proceed with
final approval and resolution of the request.
If the request is approved and resolved:
✅ Status: Resolved — Disbursement Successfully Credited
Once the request reaches the Resolved status,
the Employee Email Address associated with the request will automatically
receive an email notification confirming that the Disbursement Request
has been completed successfully.
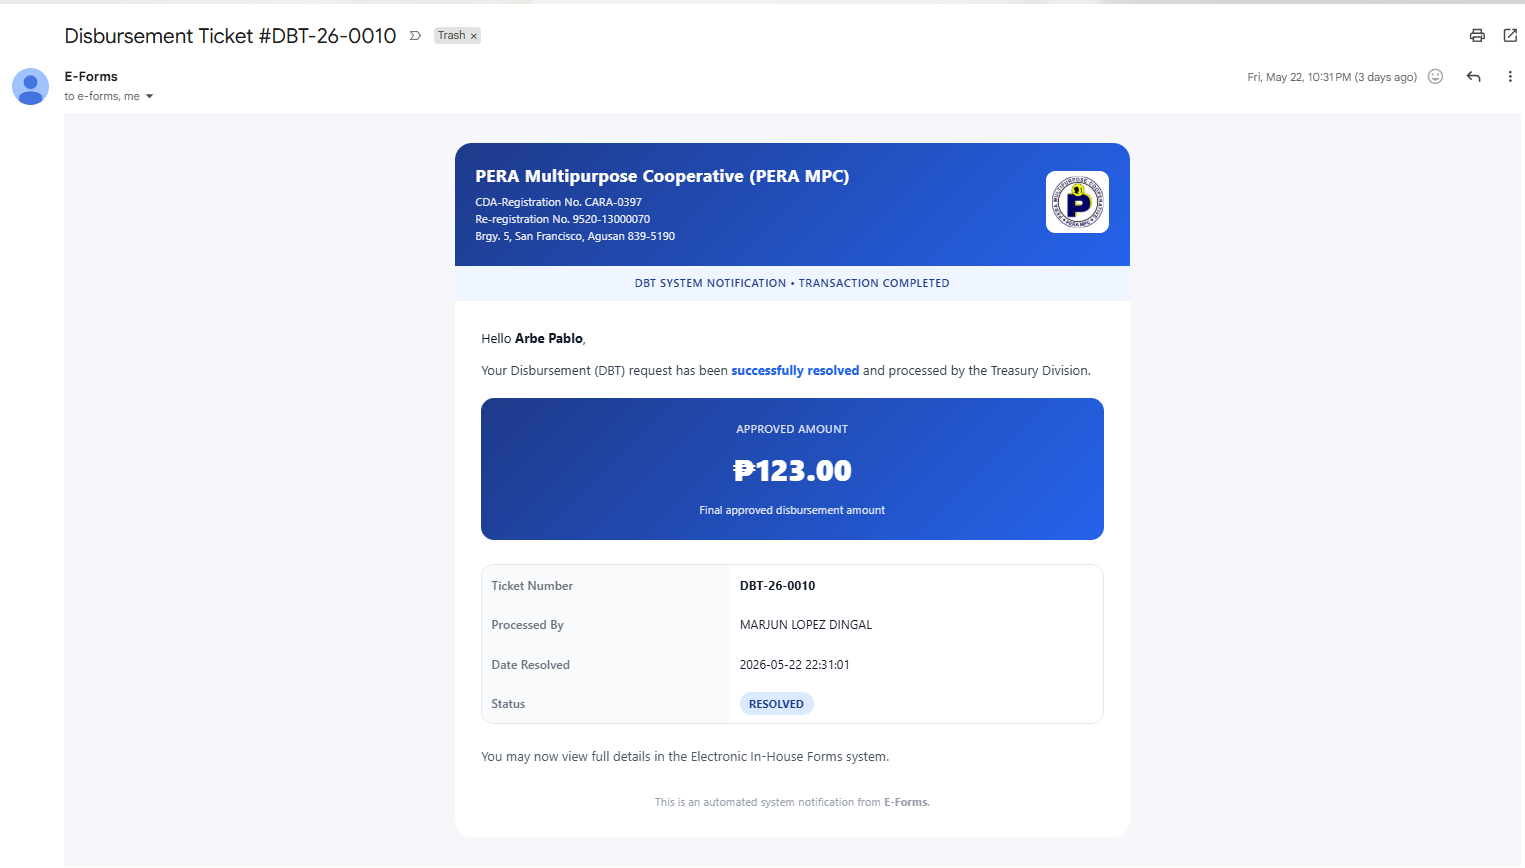
📧 Email notifications are automatically sent once the DBT Request has been
fully approved and resolved by the Head Office In-Charge / Officer.
👥 Membership Transfer Request Form
+
REQUESTER GUIDE
1. Access My Application Page
Go to the My Application page and click the “Create” button to start a new
request.
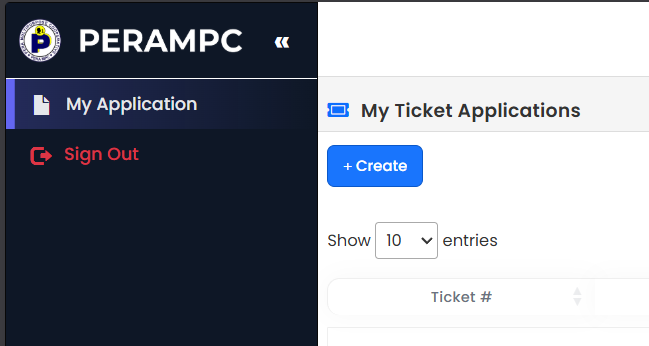
2. Select Form Type
When the Create Ticket Modal appears, click the Form Type dropdown and select
“MEMBERSHIP TRANSFER”.
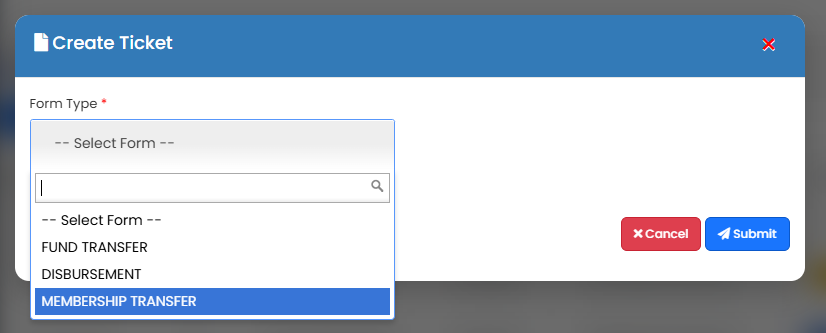
3. Enter Members Information
The Originating Office must complete all required transfer details, verify the
accuracy of the information provided, and ensure supporting documents are attached
before submitting the request.
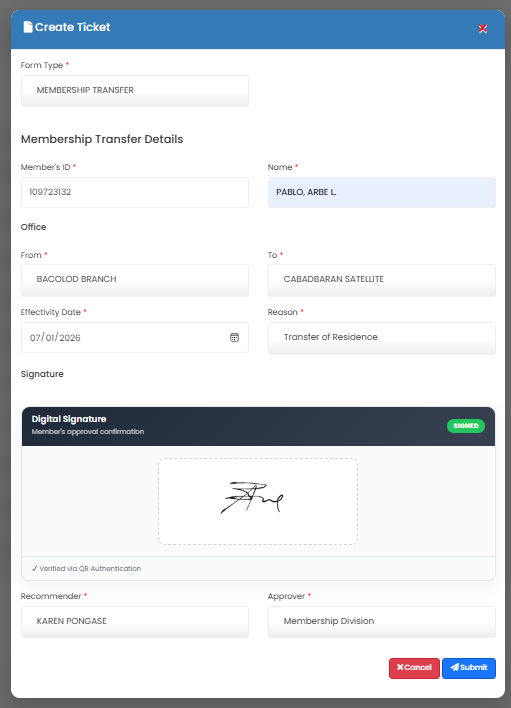
Note:
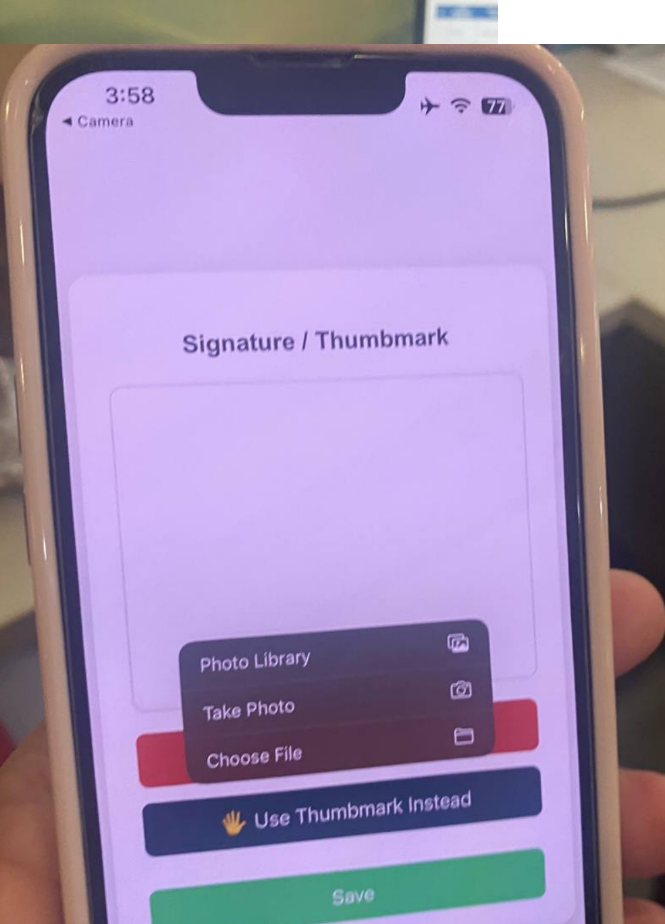
To attach a signature or scanned thumbmark file, click the
"Click to Scan QR to Sign/Upload" button and follow the on-screen
instructions.
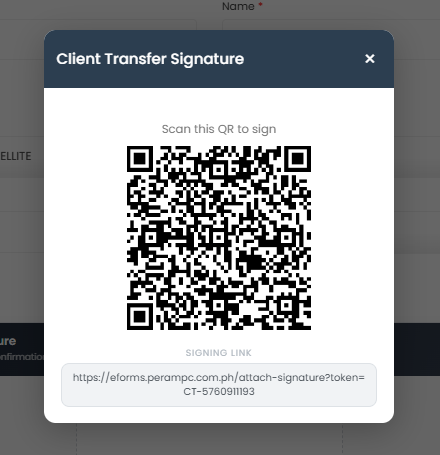
Important:
Scenario 1 – Member is Present
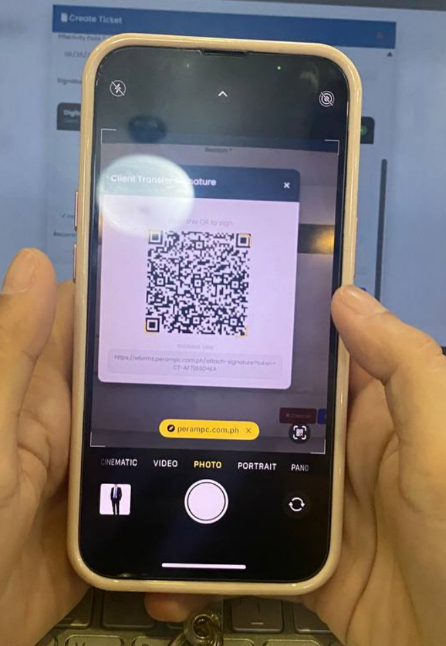
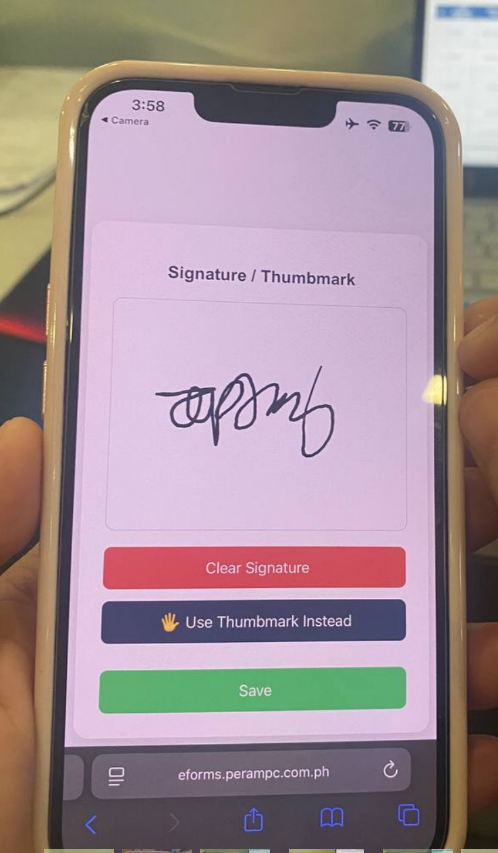
The originating office shall scan the QR code using a mobile device and present the Signature Pad page to the member. The member shall then provide their electronic signature directly on the device. If the member is unable to sign, he/she may provide a thumbmark instead. In such cases, a witness must sign beside the thumbmark to validate the request.
Scenario 2 – Member is Already at the Receiving Office
The originating office shall process the transfer request and forward its corresponding QR code to the receiving office, where the requesting member is present and shall affix his/her signature and/or thumbmark.
Scenario 1 – Member is Present
The originating office shall scan the QR code using a mobile device and present the Signature Pad page to the member. The member shall then provide their electronic signature directly on the device. If the member is unable to sign, he/she may provide a thumbmark instead. In such cases, a witness must sign beside the thumbmark to validate the request.
Scenario 2 – Member is Already at the Receiving Office
The originating office shall process the transfer request and forward its corresponding QR code to the receiving office, where the requesting member is present and shall affix his/her signature and/or thumbmark.
4. Submit Request
The request will then be forwarded to the Cluster Head of the originating cluster for
verification and recommendation before it is elevated to the next approving authority.
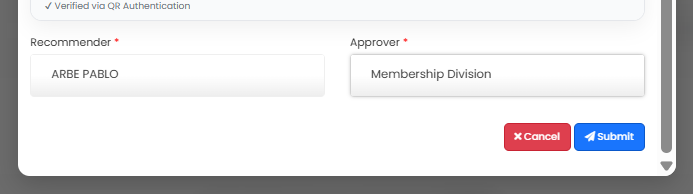
✓ Membership Transfer Request Submitted — Pending Cluster Head Verification &
Recommendation
ROLE TRANSITION
RECOMMENDER GUIDE
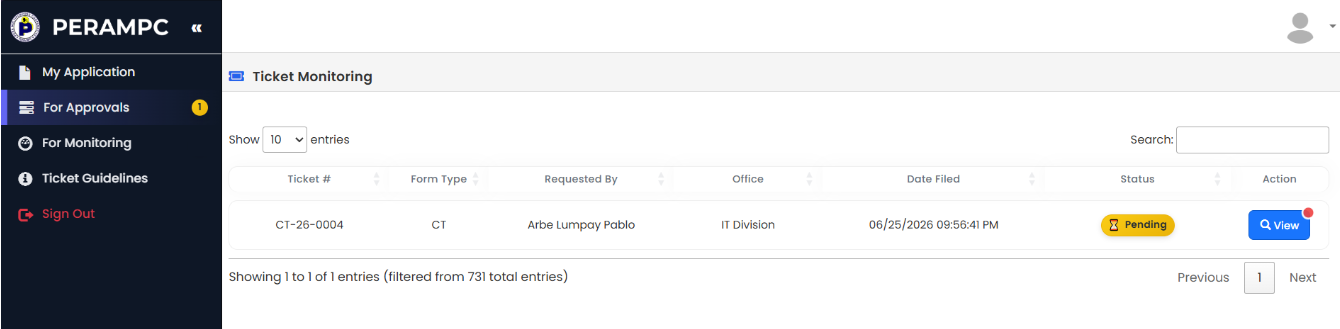
1. Access For Approvals Page
Go to the For Approvals page and click the “View” to take action of the
pending
request.
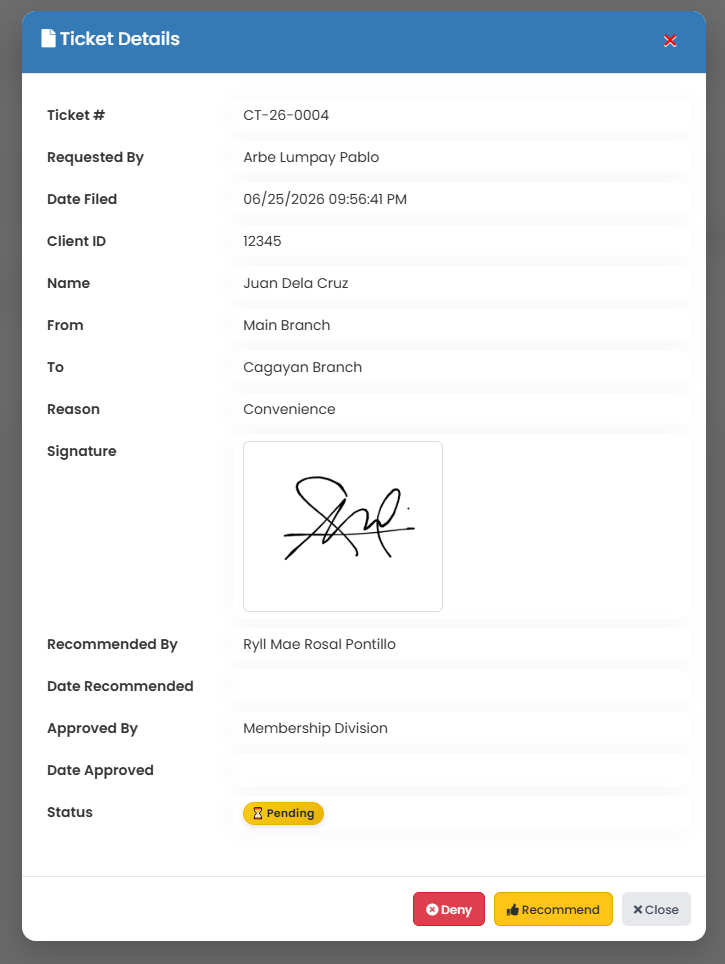
2. Open Ticket Details & Select Action
Once the Ticket Details Modal appears, review all request information
carefully.
Then choose your action based on evaluation:
Then choose your action based on evaluation:
• Click “Recommend” if the request is valid and approved for
next level processing.
• Click “Deny” if the request is invalid, incomplete, or not approved.
• Click “Deny” if the request is invalid, incomplete, or not approved.
✓ Recommend → Approve for Next Level
✕ Deny → Reject Request
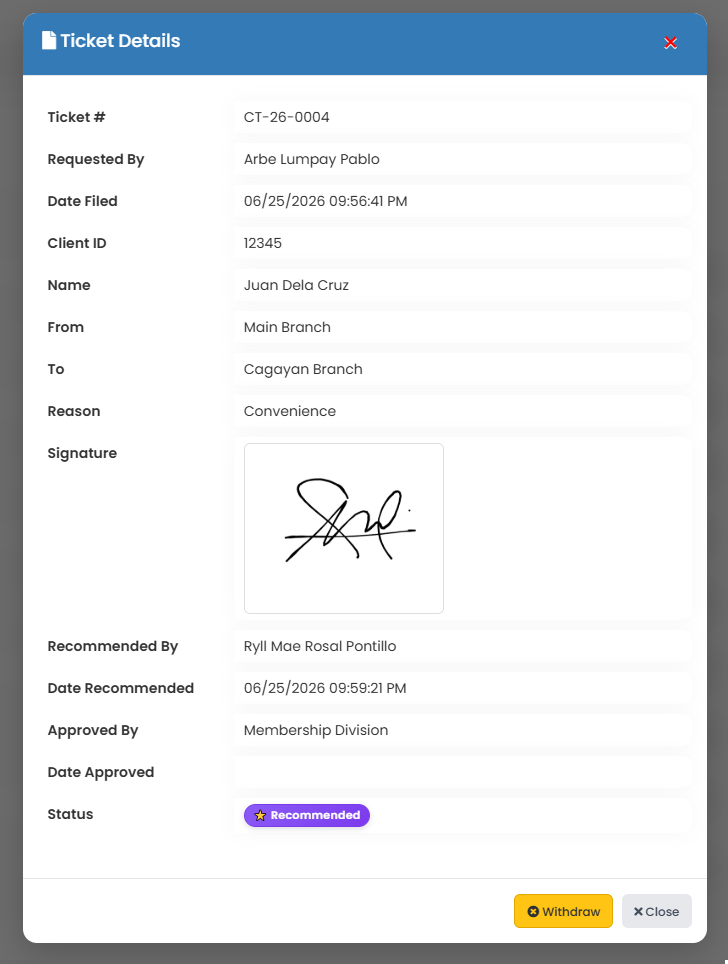
3. System Status Update After Action
After selecting an action in Step 2, the system will automatically update the request status
based on your decision.
If you click “Recommend”:
⭐ Status: Recommended — Pending Approver Action
The request will be forwarded to the Membership Department Head for final
verification and approval processing.
📝 The Requester may still submit a withdrawal request while the status is
Recommended, provided that the request has not yet been approved by the Approver.
If you click “Deny”:
✕ Status: Denied — Request Closed
If the requester submits a withdrawal request and the Recommender approves the
withdrawal,
the request status will automatically become:
🚫 Status: Cancelled — Withdrawal Approved
ROLE TRANSITION
MEMBERSHIP DEPARTMENT
4. Verification by Membership Department Personnel
After the request has been reviewed and recommended, it shall first be
checked and verified by the designated Membership Department Personnel.
The verifier shall review the submitted information and supporting
documents to ensure that all requirements are complete, accurate,
and ready for final approval.
If verification is completed:
✅ Status: Checked & Verified
The request shall be endorsed to the
Membership Department Head for final review and approval.
APPROVER GUIDE
5. Final Review and Approval
Upon receipt of a Checked & Verified request, the
Membership Department Head shall conduct the final evaluation
of the Membership Transfer Request and may either approve or deny
the request based on the verified information and submitted
supporting documents.
If the request is approved:
✅ Status: Approved — Membership Transfer Request Completed
The Membership Transfer Request is officially approved and may proceed
with implementation.
If the request is denied:
❌ Status: Denied — Membership Transfer Request Closed
The request shall not proceed and will be returned together with the
corresponding remarks or reason for denial.
📒 Checkbook Request Form
+
REQUESTER GUIDE
1. Access My Application Page
Go to the My Application page and click the “Create” button to start a new
request.
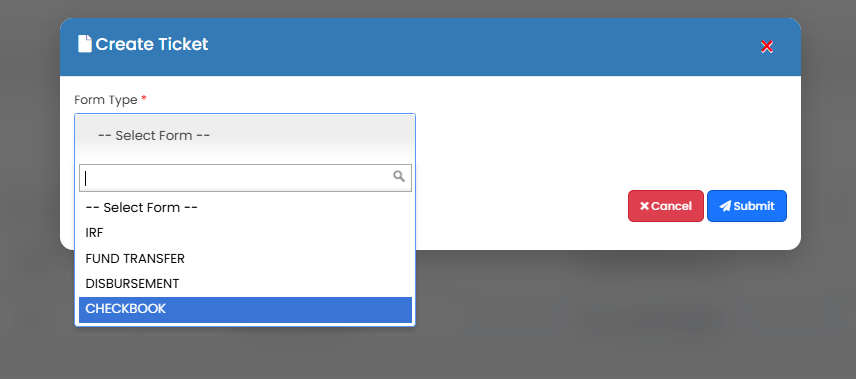
2. Select Form Type
When the Create Ticket Modal appears, click the Form Type dropdown and select
“CHECKBOOK”.
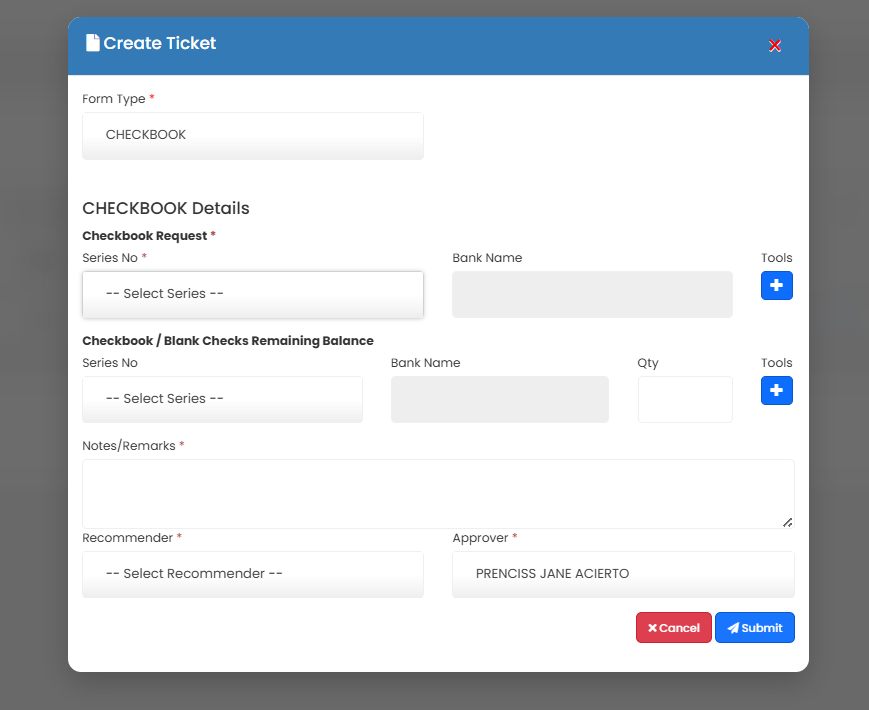
3. Complete Required Information
Fill out all required fields accurately and ensure all details are correct before
proceeding.
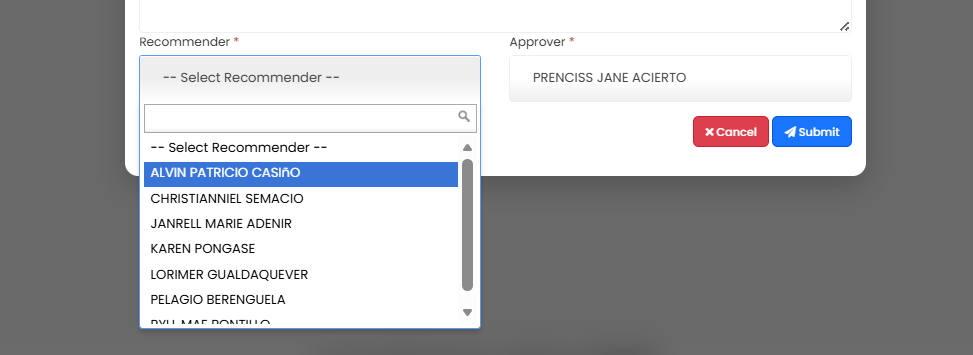
4. Select Recommender
Click “Select Recommender” and choose the appropriate Cluster Head
of your
office as the official recommender.
5. Submit Request
Click “Submit” once all details have been verified and completed. Your request will
then be forwarded for approval.
✓ Checkbook Request Submitted — Pending Recommender Review
ROLE TRANSITION
RECOMMENDER GUIDE
1. Access For Approvals Page
Go to the For Approvals page and click the “View” to take action of the
pending
request.
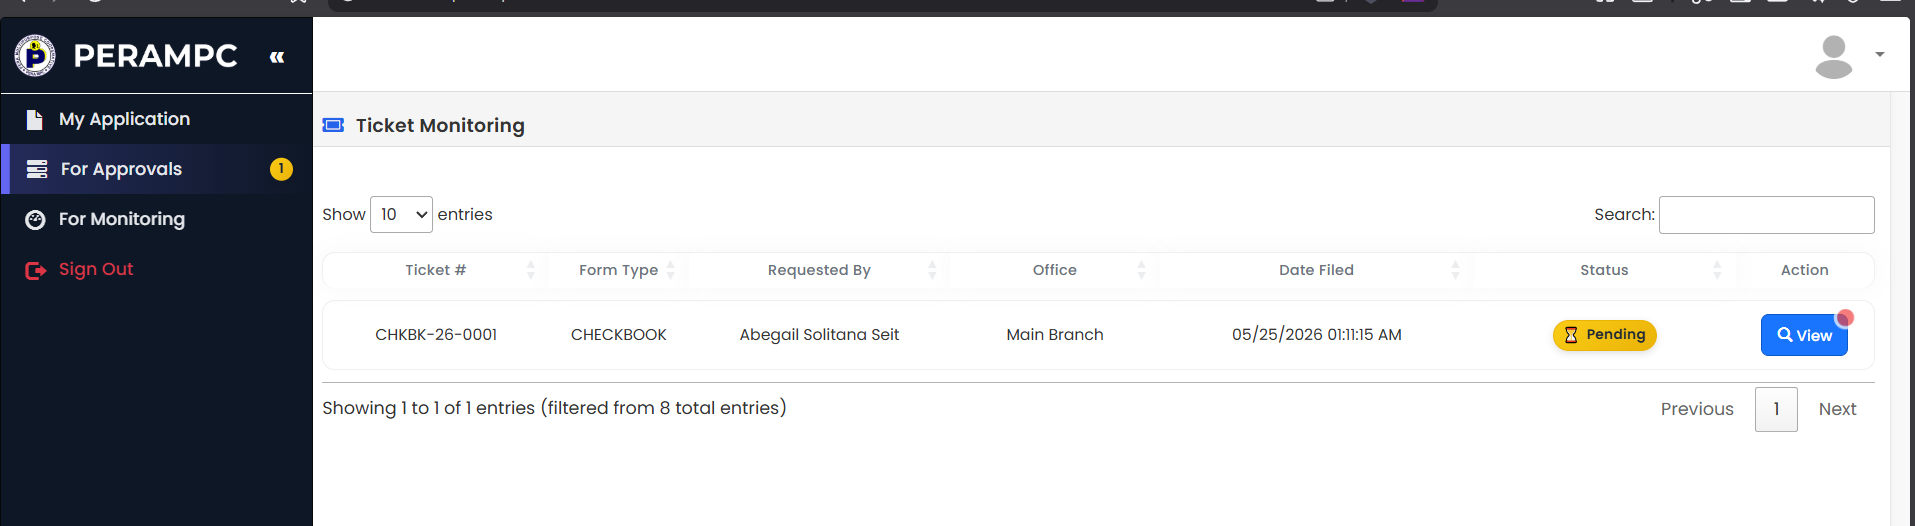
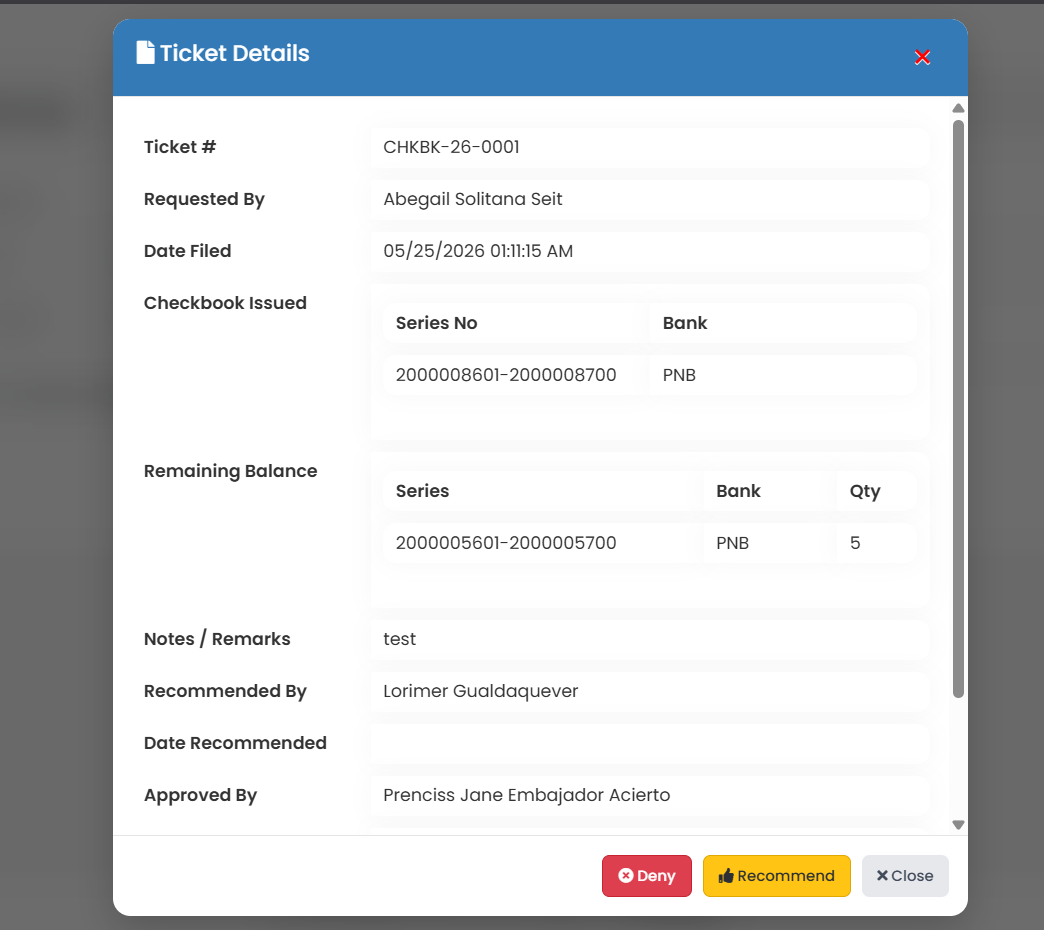
2. Open Ticket Details & Select Action
Once the Ticket Details Modal appears, review all request information
carefully.
Then choose your action based on evaluation:
Then choose your action based on evaluation:
• Click “Recommend” if the request is valid and approved for
next level processing.
• Click “Deny” if the request is invalid, incomplete, or not approved.
• Click “Deny” if the request is invalid, incomplete, or not approved.
✓ Recommend → Approve for Next Level
✕ Deny → Reject Request
3. System Status Update After Action
After selecting an action in Step 2, the system will automatically update the request status
based on your decision.
If you click “Recommend”:
⭐ Status: Recommended — Pending Approver Action
The request will be forwarded to the Head Office In-Charge / Officer for final
verification and approval processing.
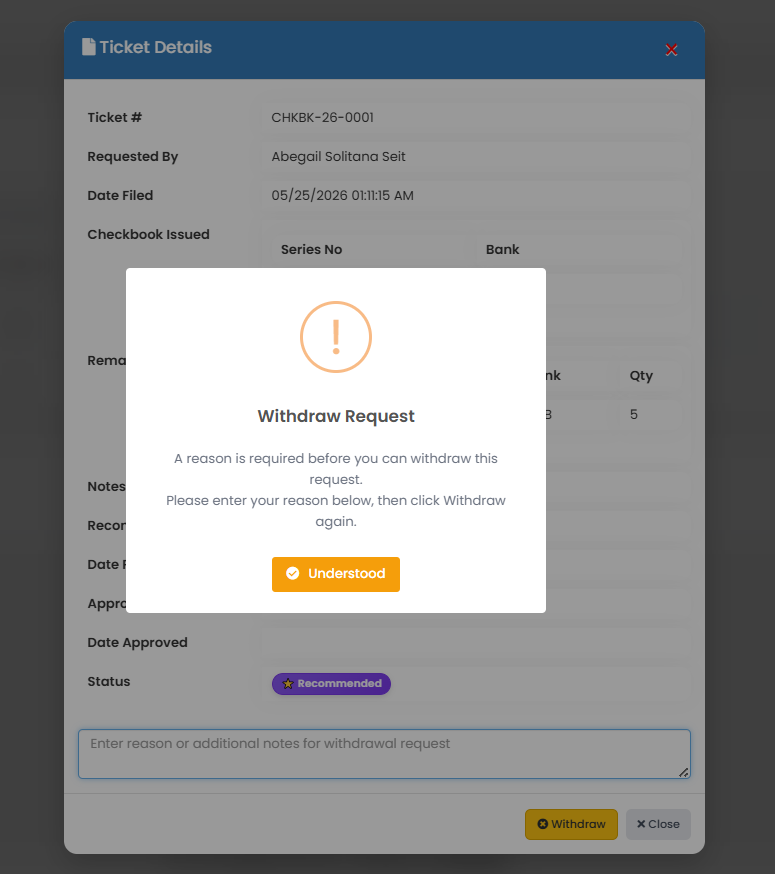
📝 The Requester may still submit a withdrawal request while the status is
Recommended, provided that the request has not yet been approved by the Approver.
If you click “Deny”:
✕ Status: Denied — Request Closed
If the requester submits a withdrawal request and the Recommender approves the
withdrawal,
the request status will automatically become:
🚫 Status: Cancelled — Withdrawal Approved
ROLE TRANSITION
TREASURY DEPARTMENT
1. Treasury Department Approval
The Treasury Department shall review the submitted Checkbook Request.
Once all submitted information and supporting documents have been verified,
the authorized approving officer may approve the request for processing.
If the request is approved:
✅ Status: Approved
2. Checkbook Processing
Once the request has been approved, the Treasury Personnel shall
prepare and process the requested checkbook. This includes verifying the
account details, assigning the appropriate checkbook series, recording the
issuance in the system, and preparing the checkbook for release.
While the request is being processed:
⏳ Status: In-Process
3. Checkbook Transmission
After the checkbook has been completely processed, the
Treasury Personnel shall securely package and transmit the
checkbook to the requester through an authorized courier service
(e.g., J&T Express, LBC Express, or any other available
courier) or through an official transmittal, as applicable.
Before completing the transaction, the processor shall record the transmission details, including the courier or transmittal information, tracking number (if applicable), date of dispatch, and upload the corresponding Courier Receipt or Transmittal Receipt as proof of delivery. These records shall serve as the official reference for monitoring and future verification.
Before completing the transaction, the processor shall record the transmission details, including the courier or transmittal information, tracking number (if applicable), date of dispatch, and upload the corresponding Courier Receipt or Transmittal Receipt as proof of delivery. These records shall serve as the official reference for monitoring and future verification.
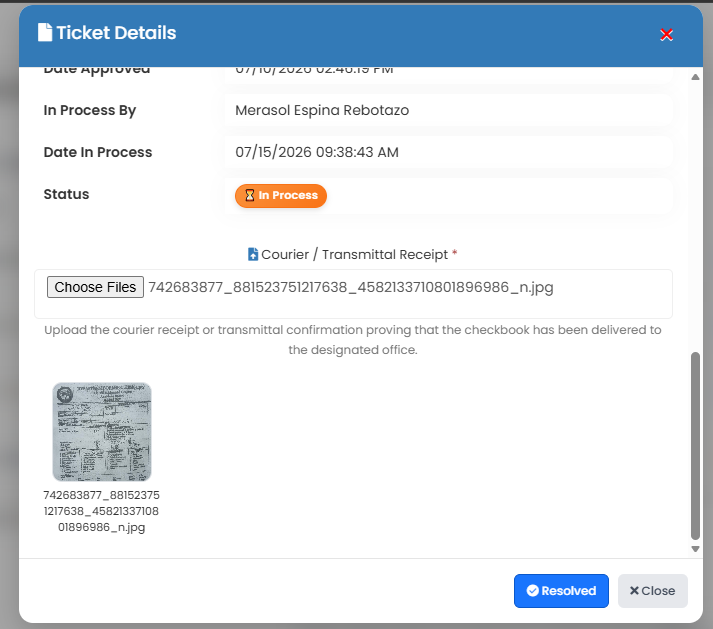
Once the checkbook has been successfully transmitted and the proof of transmission has
been uploaded:
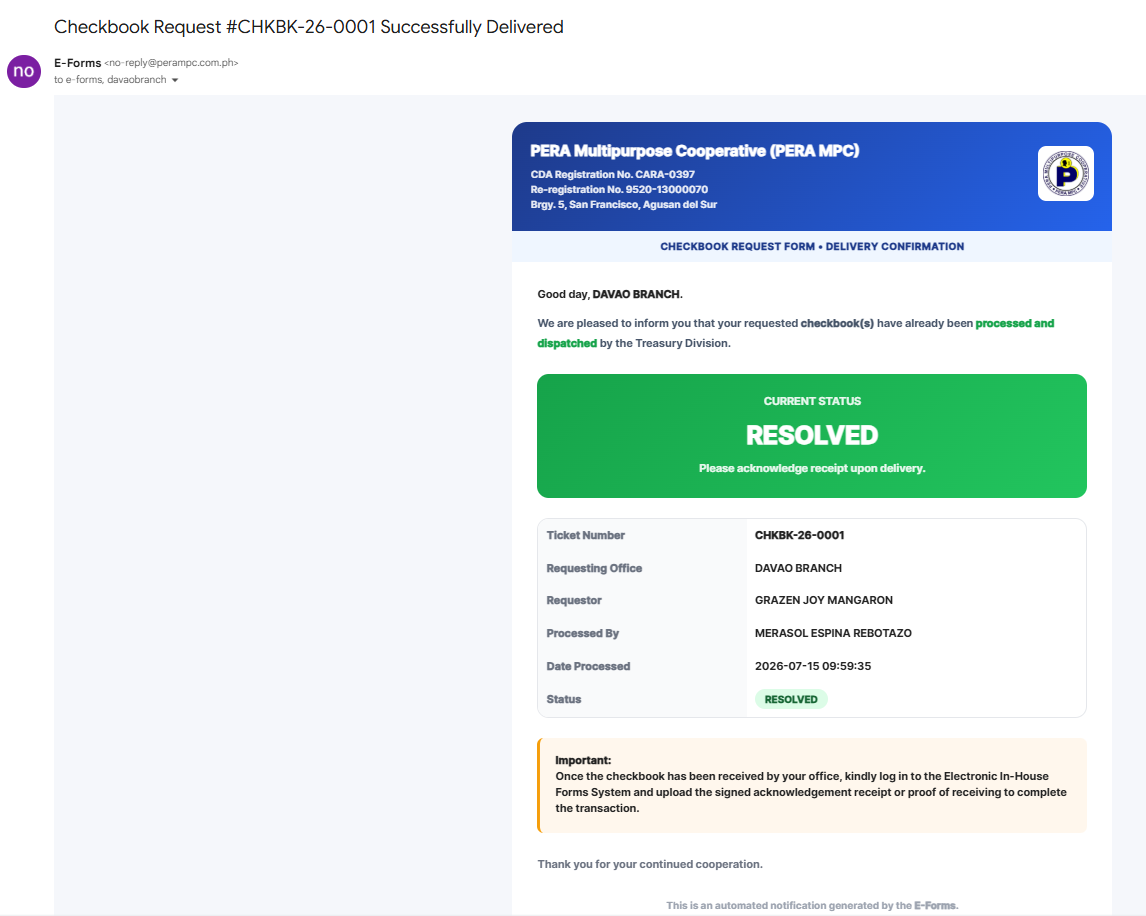
📧 Note: Once the request has been marked as Resolved, the system will
automatically send an email notification to the Requestor. The email will
include the request details and inform the Requestor that the checkbook has
been transmitted. The Requestor should then monitor the delivery and, upon
receipt, update the ticket status to Received and upload the signed
Acknowledgement Receipt to complete the transaction.
✅ Status: Resolved
ROLE TRANSITION
RECEIVER GUIDE
1. Confirm Receipt of Checkbook
Once the checkbook has been delivered to the respective office, the
Requestor shall verify that the received checkbook matches the
approved request and is in good condition.
After verification, the Requestor must update the ticket status to "Received" and upload the duly signed Acknowledgement Receipt as proof that the checkbook has been successfully received. This document serves as the official confirmation of receipt and completes the transaction.
After verification, the Requestor must update the ticket status to "Received" and upload the duly signed Acknowledgement Receipt as proof that the checkbook has been successfully received. This document serves as the official confirmation of receipt and completes the transaction.
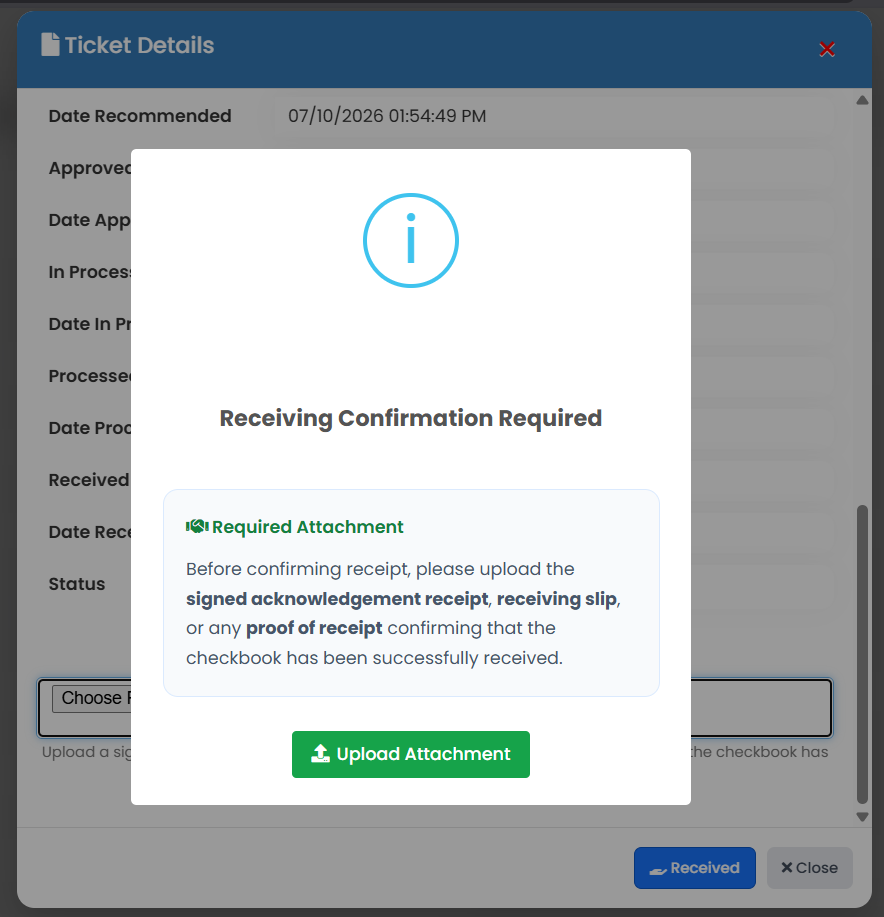
Once the checkbook has been received and the signed Acknowledgement Receipt has been
uploaded:
📥 Status: Received
💻 IT Service Request
+
REQUESTER GUIDE
1. Access My Application Page
Go to the My Application page and click the “Create” button to start a new
request.
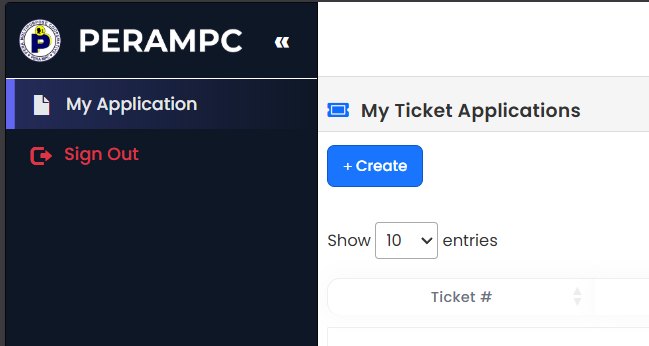
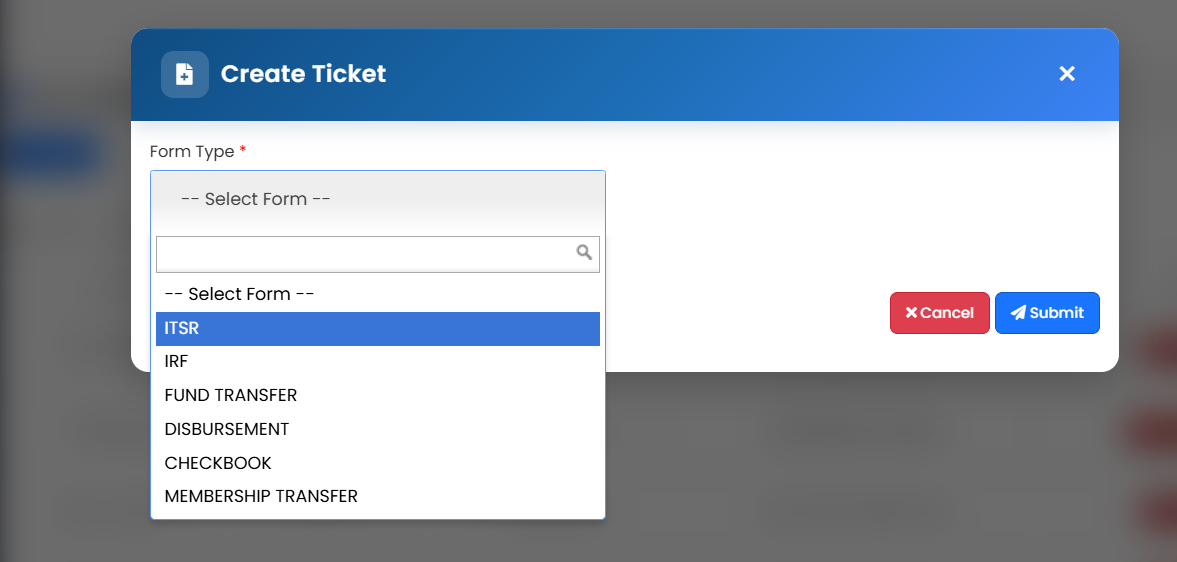
2. Select Form Type
When the Create Ticket Modal appears, click the Form Type dropdown and select
"ITSR".
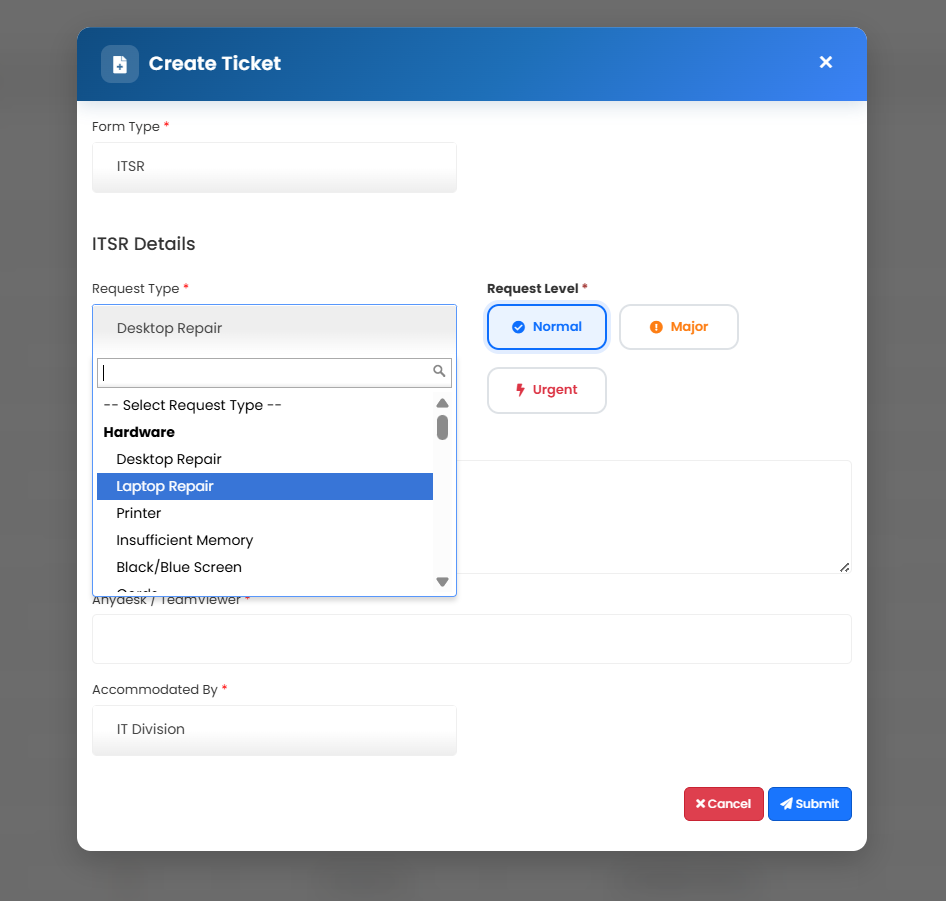
3. Complete All Required Information
Complete all required fields accurately and select the correct
Request Type that best matches your IT concern or request.
Review all information carefully and make sure the details are complete
and correct before proceeding.
4. Submit IT Service Request
Click “Submit” once all information has been completed and reviewed.
Your IT Service Request (ITSR) will then be submitted to the appropriate IT
personnel for review and processing.
✓ ITSR Submitted — Pending IT Review
ROLE TRANSITION
IT DEPARTMENT
1. IT Department Acceptance & Processing
The IT Department shall review the submitted IT Service Request (ITSR).
Once the request has been received and accepted by the IT Department, the
request will be placed In Progress to indicate that IT has acknowledged
the request and has started reviewing or processing the reported concern.
Once the request has been received by IT:
🔄 Status: In Progress
If the request is denied:
❌ Status: Denied — IRF Request Closed
The request shall not proceed and will be returned together with the
corresponding remarks or reason for denial.
2. Multimedia Request Processing
For Multimedia requests, such as flyers, tarpaulins, posters, announcements,
and other multimedia materials, the Multimedia Team shall review and process
the request based on the details and requirements provided by the requester.
Once the requested material has been completed, the Multimedia Team will reply to
the ITSR with the finished file or output for the requester to review and download.
Once the completed material is provided:
The requester should download and review the completed material.
If the request has been fulfilled and no further action is required,
click the “Resolved” button to confirm that the request has been
completed and to close the ITSR ticket.
✅ Status: Resolved — Ticket Closed
3. Technical / Web Development Request Resolution
For ITSR requests that are not related to Multimedia, the appropriate
Technical Team or Web Development Team shall handle and process
the request based on its nature and requirements.
Once the reported issue has been resolved or the requested IT service has been completed, the assigned personnel shall click the “Resolved” button to indicate that the request has been successfully addressed and to close the ITSR ticket.
Once the reported issue has been resolved or the requested IT service has been completed, the assigned personnel shall click the “Resolved” button to indicate that the request has been successfully addressed and to close the ITSR ticket.
Once the request has been successfully resolved:
✅ Status: Resolved — Ticket Closed
📌 Note: The assigned IT personnel should only mark the ITSR as
Resolved after the requested service has been completed or the reported
issue has been successfully addressed.
📄 iAccs Request Form
+
REQUESTER GUIDE
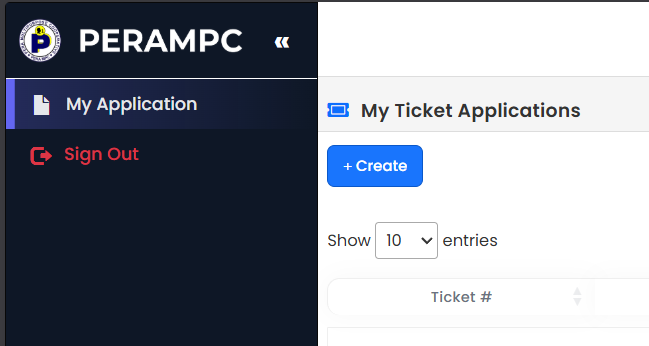
1. Access My Application Page
Go to the My Application page and click the “Create” button to start a new
request.
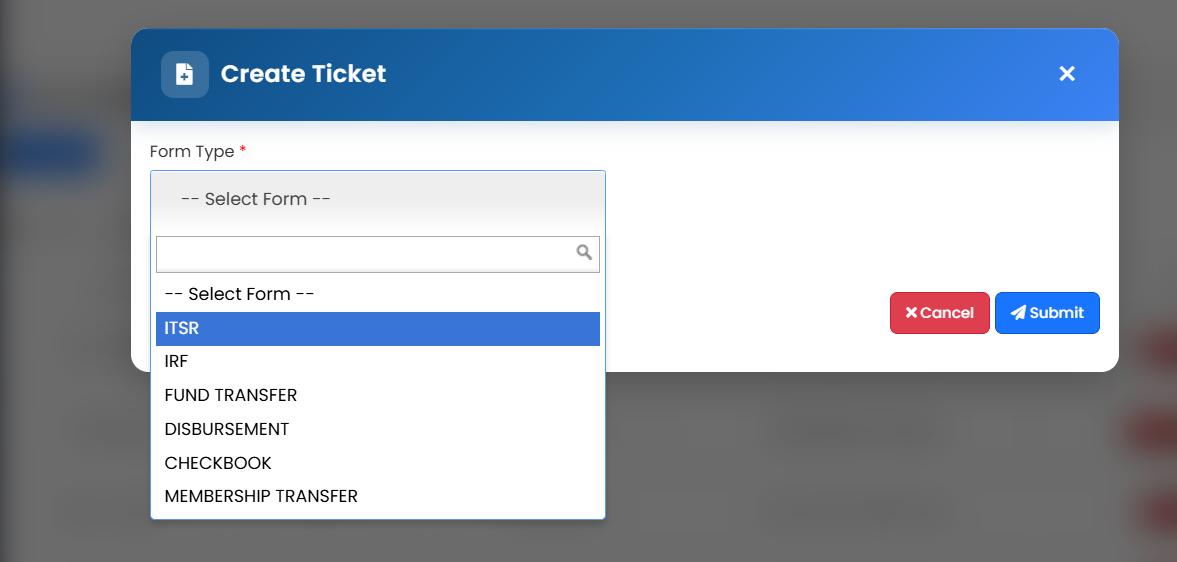
2. Select Form Type
When the Create Ticket Modal appears, click the Form Type dropdown and select
"IRF".
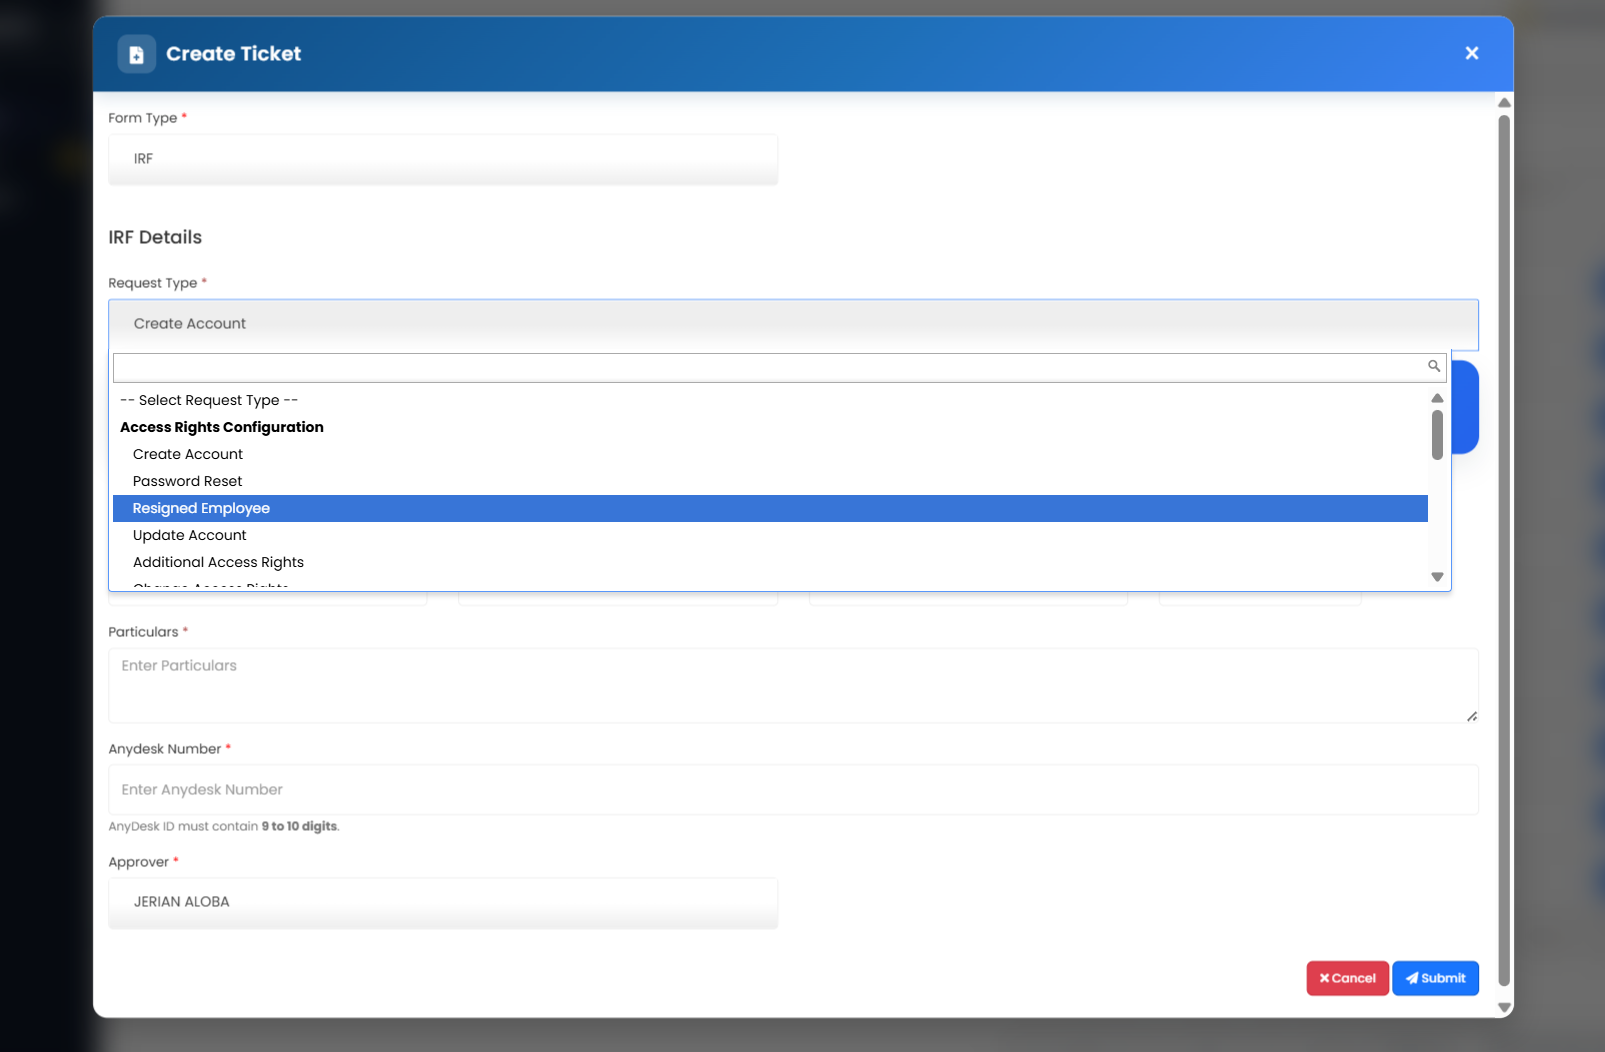
3. Complete All Required Information
Complete all required fields accurately and select the appropriate
Request Type based on the type of account or access
change being requested. Review all information carefully and make sure
the details are complete and correct before proceeding.
📌 Understanding the Update Account, Additional Access Rights, & Change Access Rights
Request Types
1. Update Account
Update an existing user account, such as enabling a disabled account,
disabling an active account, or modifying account information for
transferred employees.
Scenario:
If Employee A from Branch 1 is temporarily assigned to
Branch 2 as a reliever due to a manpower shortage, and Employee A
already has an existing account in Branch 2, the appropriate request type
is Update Account.
📌 Note: If account access also needs to be disabled, select the
Disable Account checkbox when submitting the Update Account request.
2. Additional Access Rights
Grant additional access while retaining the user's current access rights.
Scenario:
Employee A, the Bookkeeper from Branch 1, has an
approved vacation leave from June 24 to June 26. To ensure that
branch operations continue without disruption during Employee A's absence,
Employee B requests Additional Access Rights, changing the
access from Loan Processor to Loan Processor and Bookkeeper.
📌 Notes:
i. Always request to disable access for employees who are on leave
and/or submit an Update Account request when necessary.
ii. The Head Cashier shall not be granted additional access rights,
except under the following conditions:
a. When there are at least two employees on duty; or
b. When there are three employees on duty, provided that the third employee is newly hired and not yet proficient in cashiering transactions.
b. When there are three employees on duty, provided that the third employee is newly hired and not yet proficient in cashiering transactions.
c. Under no circumstances shall the Head Cashier or Cashier
be granted access to the functions of the
Loan Processor.
3. Change Access Rights
Change an employee's existing access right to another access right.
Scenario:
Employee C, the Head Cashier, is on sick leave. To ensure
that operations will not be disrupted, Employee A, the
Bookkeeper, requests a Change Access Rights from
Bookkeeper to Head Cashier.
📌 Notes:
i. Disable Employee C's access in the same ticket.
ii. Requests for Additional Access Rights and/or
Update Account may also be included in the same ticket,
when necessary.
4. Submit iAccs Request
Click “Submit” button after all details have been carefully reviewed and required
information has been completed. Your iAccs Request Form (IRF) will then proceed
through the appropriate review and approval workflow.
📌 Approval Workflow:
If a Recommender is assigned to the request, the IRF will first be forwarded to the Recommender for evaluation and recommendation before proceeding to the Final Approver.
If no Recommender is assigned, the IRF will proceed directly to the appropriate Final Approver for review and approval.
If a Recommender is assigned to the request, the IRF will first be forwarded to the Recommender for evaluation and recommendation before proceeding to the Final Approver.
If no Recommender is assigned, the IRF will proceed directly to the appropriate Final Approver for review and approval.
✓ IRF Submitted — Pending Review
ROLE TRANSITION
ACCOUNTING DEPARTMENT
1. Review and Recommendation
If the Accounting Department is designated as the
Recommender for the submitted iAccs Request Form (IRF),
the assigned Accounting personnel shall review and verify the
request to ensure that it follows the correct procedure and
that the requested account or access changes are appropriate.
The Recommender shall carefully review the submitted information, including the selected Request Type, employee details, requested access rights, and other relevant information before making a recommendation.
The Recommender shall carefully review the submitted information, including the selected Request Type, employee details, requested access rights, and other relevant information before making a recommendation.
If the request follows the correct procedure:
The Accounting Department shall click the
“Recommend” button. The IRF will then proceed to the
designated Final Approver for final review and approval.
✓ Status: Recommended — Pending Final Approval
📌 Note:
The Recommender should only click “Recommend” after verifying
that the request follows the proper procedure and that the submitted
information is complete and appropriate. Once recommended, the request
will be forwarded to the designated Final Approver.
If the request is denied:
❌ Status: Denied — IRF Request Closed
The request shall not proceed and will be returned together with the
corresponding remarks or reason for denial.
ROLE TRANSITION
IT INFRASTRUCTURE
1. Remote Processing and Resolution
Once the IRF has been properly recommended and approved, the
IT Infrastructure Team shall review the approved request and
proceed with the required technical action.
Where applicable, the assigned IT Infrastructure personnel may remotely access the user's workstation or system to perform the necessary configuration, account, access, or infrastructure-related changes. The request shall be processed according to the approved details and the requirements specified in the IRF.
Where applicable, the assigned IT Infrastructure personnel may remotely access the user's workstation or system to perform the necessary configuration, account, access, or infrastructure-related changes. The request shall be processed according to the approved details and the requirements specified in the IRF.
While the request is being processed:
The assigned IT Infrastructure personnel shall perform the necessary
technical actions and verify that the requested changes have been
successfully implemented.
Once the request has been successfully completed:
After confirming that the requested account or access changes have
been successfully completed, the assigned IT Infrastructure personnel
shall click the “Resolve” button to indicate that the IRF has
been successfully processed and resolved.
✅ Status: Resolved — IRF Completed
📌 Note:
The Resolve button should only be clicked after the requested
account, access, or infrastructure changes have been successfully
completed and verified. Once resolved, the IRF will be considered
completed.
If the request is denied:
❌ Status: Denied — IRF Request Closed
The request shall not proceed and will be returned together with the
corresponding remarks or reason for denial.
🛡️ Compliance Department Request Form
+
REQUESTER GUIDE
1. Access My Application Page
Go to the My Application page and click the “Create” button to start a new
request.
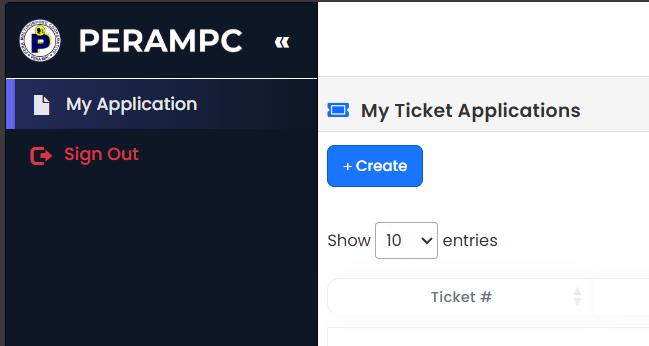
2. Select Form Type
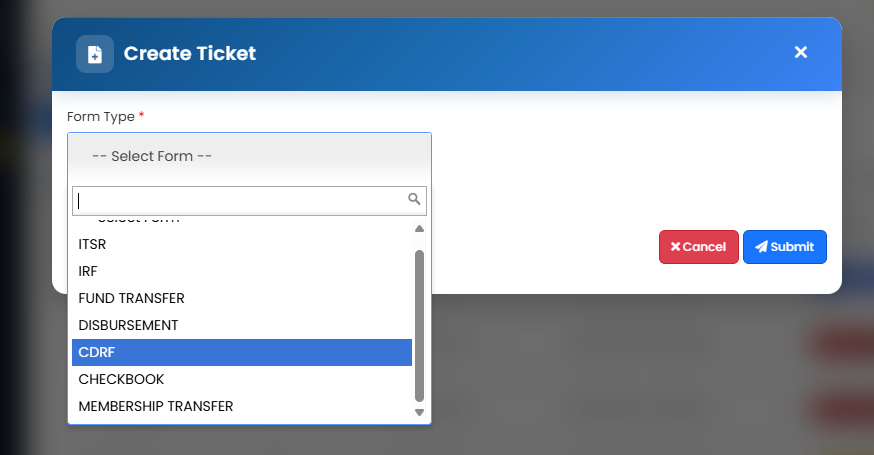
When the Create Ticket Modal appears, click the Form Type dropdown and select
“CDRF”.
3. Complete Required Information
Fill out all required fields accurately and ensure all details are correct before
proceeding.


4. Submit Request
Click “Submit” once all details have been reviewed and completed.
Your Compliance Department Request Form will then be forwarded to the
designated recommender for review and recommendation.
✓ Compliance Department Request Submitted — Pending Recommender Review
📧 Upon successful submission, an email notification will
automatically be sent to the Requester’s Office confirming that
the Compliance Department Request Form has been successfully submitted
and is now Pending Recommender Review.

📝 The Requester may still submit a withdrawal request while the
status is Pending, provided that the request has not yet been
recommended by the Recommender.

⚠️ Once a Withdrawal Request is filed, the CDRF will be
automatically cancelled and will no longer proceed through the
recommendation and approval process.
🚫 Status: Cancelled — Withdrawal Approved
ROLE TRANSITION
RECOMMENDER GUIDE
1. Access For Approvals Page
Go to the For Approvals page and click the “View” to take action of the
pending
request.

2. Open Ticket Details & Select Action
Once the Ticket Details Modal appears, review all request information
carefully.
Then choose your action based on evaluation:
Then choose your action based on evaluation:
• Click “Recommend” if the request is valid and approved for
next level processing.
• Click “Deny” if the request is invalid, incomplete, or not approved.
• Click “Deny” if the request is invalid, incomplete, or not approved.
✓ Recommend → Approve for Next Level
✕ Deny → Reject Request

3. System Status Update After Action
After selecting an action in Step 2, the system will automatically update
the request status based on your decision.
If you click “Recommend”:
⭐ Status: Recommended — Pending Compliance Department Head Review
The request will be forwarded to the Compliance Department Head
for review and further action.
If you click “Deny”:
✕ Status: Denied — Request Closed
4. Final Approval & Processing
Once the CDRF has been reviewed by the
Compliance Department Head, the request may proceed with
final approval. Once approved, the system will automatically update
the request status to IN PROGRESS while the Compliance
Department processes and fulfills the request.
If the request is approved:
🔄 Status: IN PROGRESS — Compliance Request Being Processed
Once approved, the CDRF will automatically be moved to
IN PROGRESS. This indicates that the request has been
approved and is currently being processed by the
Compliance Department.

📧 Once the CDRF is approved, an email notification will
automatically be sent to the Requester’s Office Email Address
confirming that the request has been approved and is now
IN PROGRESS.
5. CDRF Communication & Additional Requirements
While the CDRF is IN PROGRESS, the Requester may use the
CDRF Communication feature to communicate directly with the
Compliance Department regarding the request.
CDRF Communication
💬 Use CDRF Communication for Follow-ups & Clarifications
The Requester may use CDRF Communication to send follow-up
messages, provide clarifications, respond to inquiries, or
communicate with the Compliance Department regarding the
submitted request.
📧 Email Notification: When a new message, mention, or
communication requiring your attention is posted in the CDRF
conversation, the concerned employee will also receive an
email notification to keep them informed and updated.


Additional Files or Documents
📎 Additional Documents May Be Requested
If the Compliance Department requires additional documents
or supporting files, the Requester should provide the requested
files through the CDRF Communication feature as soon as
possible to avoid delays in processing the request.
Adding Other Employees to the Conversation
👥 Compliance May Add Employees When Needed
When necessary, the Compliance Department may add or
loop in another employee who is directly involved or whose
assistance is required for the specific CDRF request.

📧 Notification: Once an employee is added to the CDRF
conversation, the employee will automatically receive an
email notification informing them that they have been added
to the conversation and may now participate or provide the
necessary information or documents.
⚠️ Important: Please regularly monitor the
CDRF Communication and your email while the request is
IN PROGRESS. Promptly respond to Compliance Department
inquiries, provide requested documents, and coordinate with any
employees who are added to the conversation.

6. Final Resolution or Denial
Once the Compliance Department has completed the necessary
review, received all required information and supporting documents,
and satisfied all requirements for the CDRF, the Compliance Department
may proceed with the final action by selecting “Resolve” or
“Deny”.
If all requirements have been satisfied and the request is completed:
✅ Status: Resolved — Compliance Request Completed
The Compliance Department will click “Resolve” once all
necessary requirements have been satisfied and the requested
compliance action has been completed. The CDRF will then be
marked as Resolved.
📧 Email Notification: Once the CDRF is successfully
Resolved, an email notification will automatically be sent
to the Requester’s Office Email Address confirming that
the Compliance Department Request Form has been completed.
If the request cannot be fulfilled or does not satisfy the requirements:
✕ Status: Denied — Request Closed
The Compliance Department may click “Deny” if the request
cannot be fulfilled or if the necessary requirements cannot be
satisfied. The CDRF will then be marked as Denied and the
request will be closed.